
Finally I have taken a break from the reno's of house and garden and turned my heart back to my dye pot. A squirrel convinced me. A well-fed little pest heaved himself onto my new, young sumac just as that precious plant had reached the top of the fence…and snapped the head off the sumac…I just had to use that sumac in the dye pot.
(Husband has now been equipped with an humungous $10 water pistol that shoots sprays of water forty feet…yet, in wildlife-friendly native plant gardens why curse when wild natives show up?)
So here also was the chance to check out the dye pigment potential of some of the other plants in my garden, plus one or two from the local wilds.
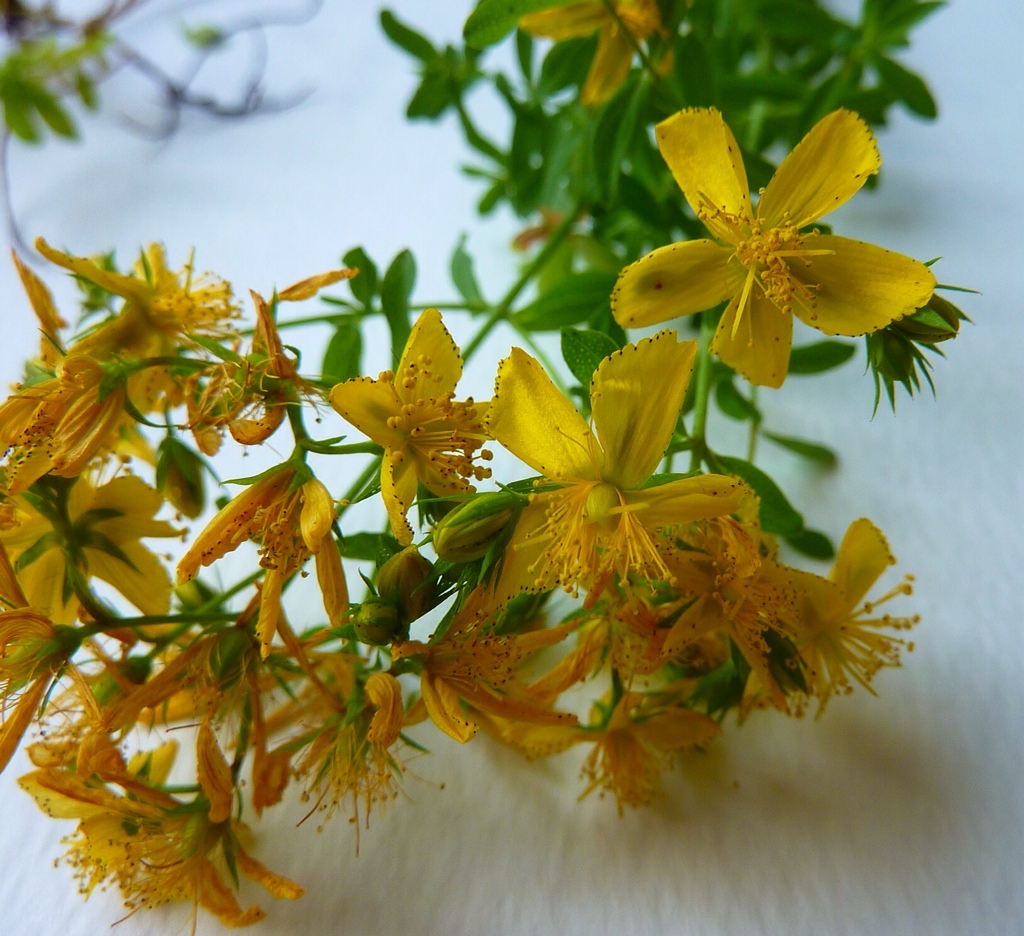
Let me begin with Hypericum perforatum, Saint John's Wort, foraged (rescued!) from nearby wild acreage dedicated to a future Big Box shopping centre that has been a long time coming…TG…
Fo my research, I have read all the reference books I own and have come away dissatisfied. Lacunae abound. Hypericum perforatum is not native to North America, though it has cousins here. It is considered a noxious, invasive weed in some quarters; even respected dyers like Rita Buchanan would rather not bother to dye with it because it is too troublesome to pick the needed quantity of flowers. (Note that other dyers may use all parts of the plant) Still, I find that hypericum offers interesting challenges.
The plant is reputed to give red, green and yellow colours, but a very particular order of extracting the pigments has been counselled by some of the Deities of Dye, chief among whom (IMHO) on the subject of hypericum performatum is Jenny Dean. ( See my Reference page for details) Most of the other Dye Deities kind of vaguely wave their sceptres over the hypericum and mutter something about it possibly giving red if you really want that..then fudge off to the next dye plant on their list whose dye properties they actually can present with authority. Or they avoid the trouble and simply quote another Dye Diva, equally vague on this plant as a dye source.
Hypericum perforatum.
The black dots along the edge of the petals actually print! If you hold the leaves up to the light, you can see wee perforations. Glands on the inflorescence hold the red dye.
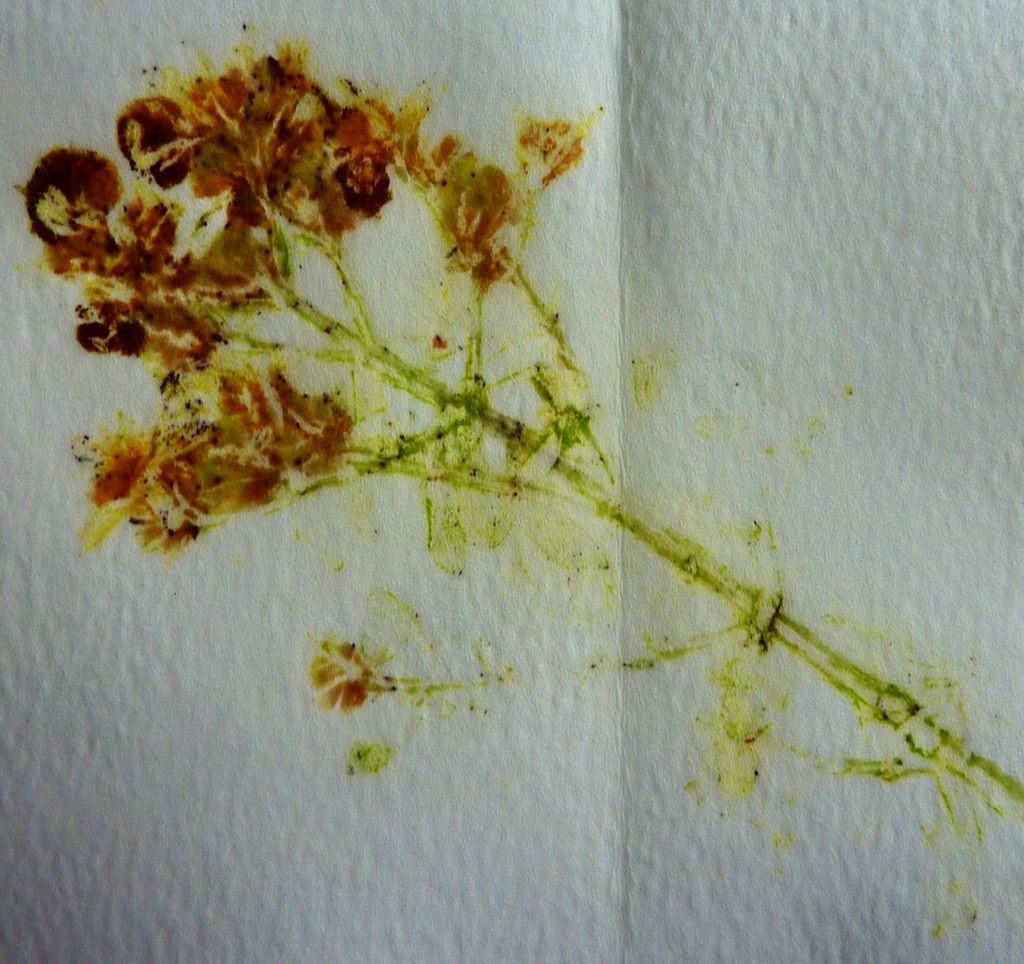
The “smoosh test” ( i.e., squishing an interesting new plant part with my fingers is my first line of investigation always) yielded this maroon colour from the flower head crushed onto paper towel:

Steeping the whole plant in rubbing alcohol was my next step.
Absolutely none of the dye authors, not even Dean or Cardon ( see refs page) managed to explain to my satisfaction how to move from dye-infused red rubbing alcohol (e.g., above) to red-dyed fibre…Many authors mention the alcohol extraction method but none provides useful details for the next step after steeping. Flint provides teasing images of the colours one might obtain with various mordants on protein and cellulose fibres, but no explanations of how obtained.
One guesses that topping the alcohol up with water might make a dye bath, so TBD, once my two jars have steeped a day or so. But I am puzzled. Why bother with the alcohol extraction when water baths seem to extract the red pigment quite easily (cf. Dean et al)? Or perhaps just smoosh the colour out for a contact print? Another TBD. Plus the authors on my Reference list offering differing counsel about which plant part to use to obtain which colour, not to mention differences in other information about processes, such as best season to gather the plant, process time, mordant, etc. I figure, as usual, that one's own experiments are the way forward, after having made genuine efforts to uncover “Best Practices”.
Hypericum (whole plant, roots included) in isopropyl alcohol:

Thus my research with Hypericum perforatum continues.

July eco prints with native plants
Now to a couple of familiar native plants that give up pigments for contact dyeing, namely sumac (Rhus typhina) and coreopsis (Coreopsis verticillata, 'Zagreb' and 'Route 66' varieties. 'Route 66' is new to me. I am not pedantic about sticking to the purely native species like C. lanceolata or C. verticillata. Hybrids are OK with me, well-behaved relatives, such as Cotinus coggygria. This plant is from 'Away', as one might say, but is the worthy cousin of Cotinus obovatus, a North American native that was here in my new garden, to my delight, along with the Bloodroot (Sanguinaria canadensis), well-known as a dye source among First Nations peoples.
'Flower Pounding' or 'Hapazome' to make contact prints
To check out some of the pigment potential in plants for contact print /dye material, I made a few prints by pounding the plant material with a hammer in order to transfer the colour and form to watercolour paper and silk. I also thought this method might be useful in revealing info about the hypericum red colour. I found that alum mordanted substrates gave best results, and that one can modify the colours obtained by pounding if one uses the customary post-dye assistants such as iron, copper, ammonia, etc.
Some plants I tried 'pounding':

Red geranium (pelargonium) with yellow-orange coreopsis v. With blue borage , top right. On water colour paper, no alum:

As above, but with alum. That coreopsis red sings!

'Route 66' (a bi coloured coreopsis, red and yellow) with red Japanese maple and red geranium , with alum:

Coreopsis verticillata 'Route 66':

Hypericum perforatum, with alum, post-modified with ammonia: You get the hypericum red this way, too!
Pansy, Japanese maple, hypericum with alum and post-modifier, ammonia (to bring out the greens) The maple lost its blue and purple – compare with the previous images:

And now the three Squirrel Bundles (no, I did not…) Three dupioni silk panels were layered with sumac, Japanese maple, Cotinus obovatus and coreopsis plus a tad of sliced bloodroot (Sanguinaria canadensis). I used mostly the busy and abundant Coreopsis verticillata 'Route 66' because my 'Zagreb' is quite weedy this year – dunno why. Since all three texiles were bundled with the same collection of plants, I expected the colour results to be the same in each. I achieved variety by using post dye-bath modifiers.
(Aside: The bloodroot and the coreopsis gave reds that look the same to me. Vibrant! )
And FYI for vintage fibre fans: the three bundles of dupioni silk were tied up with thrifted wool yarn that originated in the Rosamond Woollen Mill in Almonte, near Ottawa. When the mill closed, it became the Mississippi Valley Textile Museum (I have shown my work there in the past). The textiles were bundled with plants over copper pipe and steamed about an hour.

Two cones of vintage wool yarn from the Rosamond Woollen Mill, Almonte, Ontario:

The silk panels below, post-dye pot, are alum-mordanted dupioni, each treated with a different post-dye modifier to shift their colours.
L to R: post- modified with copper acetate; with iron; with ammonia.

The Bloodroot deserves its name:

Detail, ammonia:

Detail, iron:

Detail: Copper acetate


In future posts: dyeing with weld (Reseda luteola) and indigo (Indigofera tinctoria). The plants below in the pot were started from seed in May 2014.
The weld can be transplanted to the garden and stay over the winter but the indigo will have to be potted up and brought inside. A hitch-hiking, self-seeding columbine joins them for now…

Seeds saved from my last batch of Japanese indigo (Persicaria tinctoria) grew into these lush babies! Soon it will be time to process the leaves for blue. TBD! (They like heat and water)

For the next dye – pot, I will not wait for the squirrel…
Wendy

I love the colors from your garden….inspirational and well illustration. Thanks for sharing, I appreciate all your sharing
Thank you, Melinda! A garden is a great joy in life
Wendy
This truly wonderful ! Thank you so much for sharing all this info. !! It is the season to gather locally, and try out the native blooms here in Taos, New Mexico !! I am very grateful for all your inspiration !!
Hope we can see some of your experiments, too, Brenna! It is a fascinationg endeavour.
Wendy
I can’t for the life of me figure out the pounding method – good that somebody else can get sweet results for us to look at!
Pia,
I find fading after a few days…wonder why? Not all of the plants used for these experiments faded, though. Smooshing onto the paper with berries has always given me lasting results, no need to hammer with a heavy tool. The smooshing I did last October in Italy with dogwood berries and late blackberries are still very vivid. Not an exact science, Pia! Thus we keep coming back…for the inexactitudes…thanks for all you sharings, meantime.
Wendy
Wonderful descriptions. I love the flower pounding, the results are amazing. Thanks for sharing.
Thank you, Joy. The hapazome worked well when I did it first but I see that it has faded after a few days on paper. Must check that out!
Wendy
What a wonderful word SMOOSH is. I think I will have to SMOOSH some berries on silk and some already eco dyed linen this afternoon.
Great results! What an enjoyment to read your blog!
Mutual, Elena! Thank you. I loved your post about using the plastic bottle for bundling. I hope to try that!
Wendy
Glad to see you back in the dye studio. Stunning results. Kudos to the squirrel who was the catalyst!!
Thank you, Karen! and thank you, squirrel
Thank you for all your sharing. I have been experimenting pounding asparagus fern, dicentra and geranium flowers on linen with wonderful results. I have yet to learn about the post mordant treatments to alter colors. Do you dip the fabric in the solution or brush it on? Burgundy day lily dye creates a wonderful deep lavender on the linen.
Thank you for sharing this, Corinne! Dipping and painting on areas selectively both work to modify colours, post-pounding. The substrat makes a difference, as does the use of alum or not. I find it an interesting way to evaluate possible colour outcomes. I often smoosh on plant colours to a substrate that I have previously eco printed. Berries smoosh on well, usually giving blues and reds
Wonderful post! Thank you xxjxx
Thank you for visiting, Julie! i know you love a garden!
Good to have you back with your fabulous results and humourous posts. Just love the results in the last 3 or 4 images and the hammer pounding must try that out.
Hi Debbie,
Must post pics of the fat squirrels here and my husband’s water pistol – any excuse for owning a water pistol is a good one and the grandkids are thrilled! The squirrels remain unfazed…the waterr simpy cools them off…ah well
Smoosh prints are the way to go when your eco print needs a wee boost. Smoosh right on to the substrate or make a paste first and then paint that on or dab with fingers, mark with sticks or whatever you have at hand…it’s about the markmaking..,plus it works well with dyes that are already oozing or ready to ooze out of the fruit or bloom (lkke blue iris). I find it is a great way to get blues onto the substrate, for there are a lot of blue berries around at the end of the summer and maybe a stack of eco prints looking for the blues. Do tell your experiments here!
Good smooshing
Wendy
I heart this post so hard!
Heart your comment, Ms. GrackleBird
I’ve been so busy harvesting from the garden and putting up that eco printing took a backseat, until I read your post, of course! Now I must go a gathering, too. Thanks for the inspiration to get going. Speaking of gathering, my husband said men and women are still gatherers and hunters…women are gathering evidence and men are hunting excuses…not in his case, but for his credit that was pretty good insight 🙂
Did some harvesting myself – green tomatoes for chutney because i sacrificed a tomato plant for the sake of a native shrub nearby…the garden is endless interesting – and distracting! Thank you for the visit
wendy, do you steam your bundles in the oven??
Jeanne, I usually steam them full blast on a rack in an old aluminum turkey roaster, lid on tight.
The bundles need never to dry out, so oven methods are more work.
See my refs page to check other well documented methods, e.g. Karen Leigh Casselman’s article “In The Bag”in which she describes microwave methods, as well as others. India Flint, KLC’s student, gives info on her own methods but it is rather more vague.