
Tutorial 3 ECO PRINTING BASICS
Note that these are my current practices. In your own research and experiments, you may well discover other processes that work well for you. Take what you can responsibly use and leave the rest.
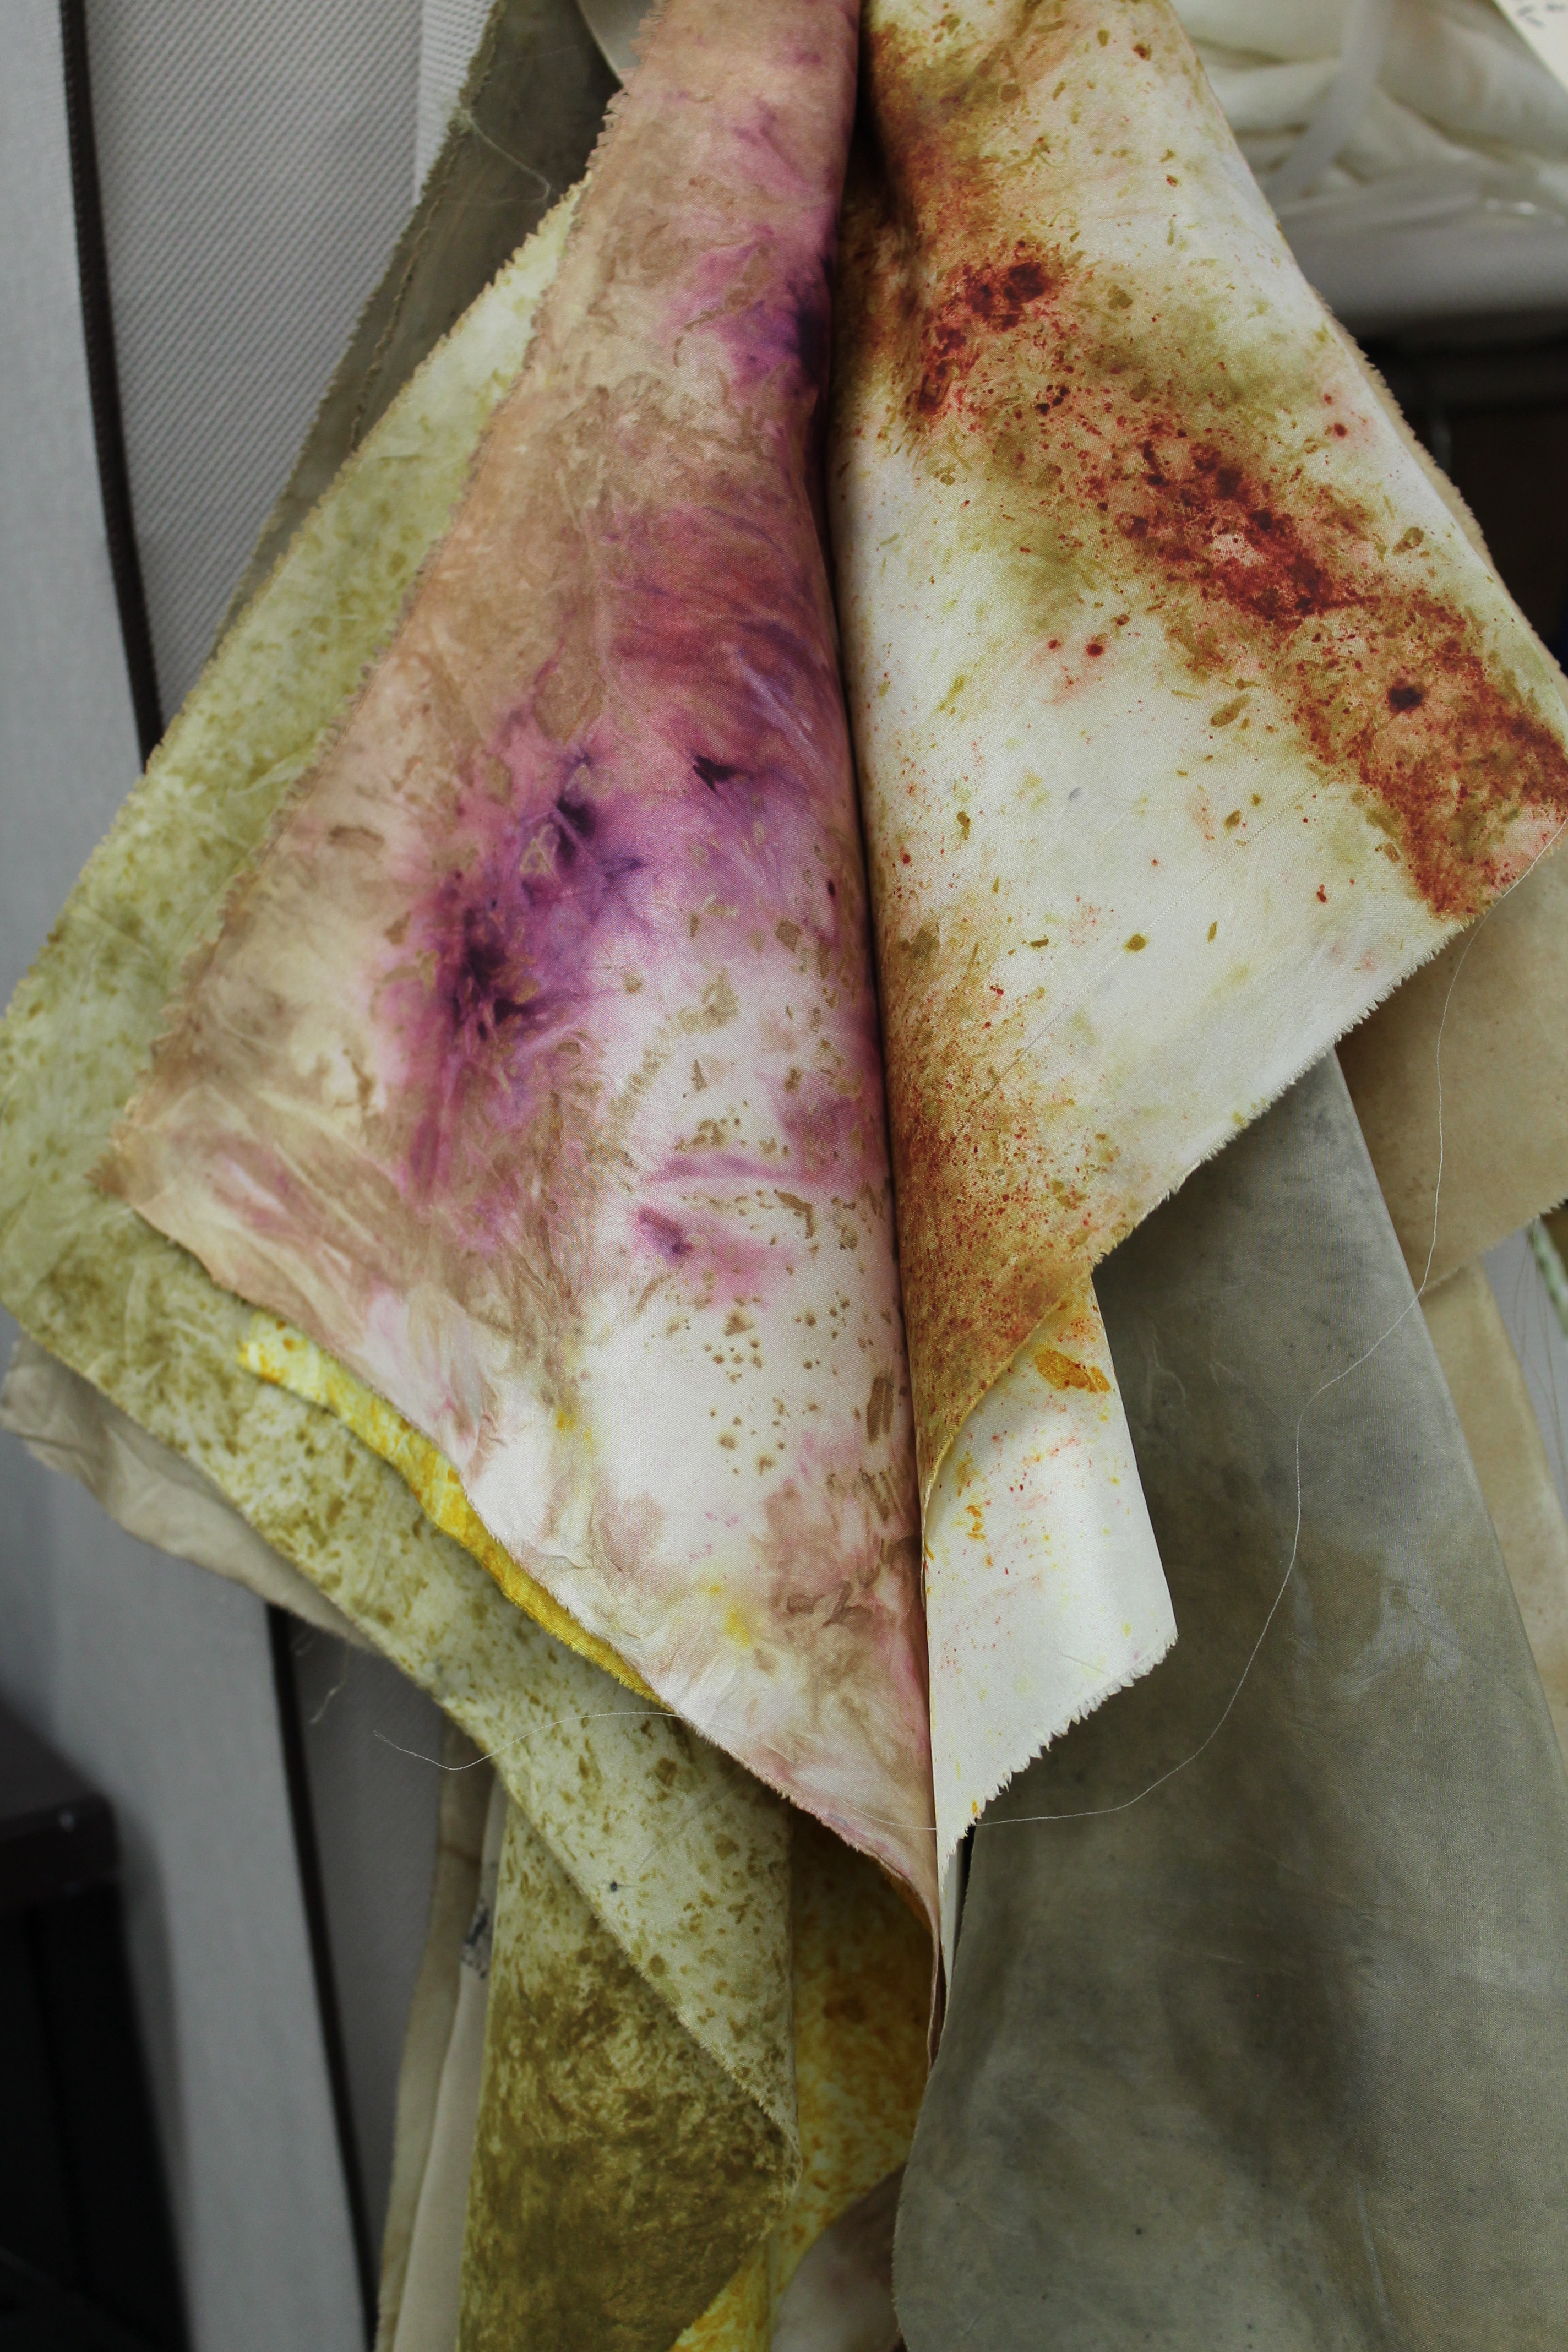
Eco printing or eco dyeing is a contemporary application of the traditions of natural dyeing. In eco printing or dyeing, plants are enclosed in textiles or paper, bundled by winding over rods or stacked in layers and then steamed or immersed in hot water to extract the pigments and produce a print made with plant dyes. Direct and close contact between the plant and the substrate is essential. Leaves, stems, flowers, buds, seeds and roots may be used; also bark and wood. At different seasons of the year, different pigments may concentrate in various plant parts so great colour variability is possible – and desirable! Eco dyeing and printing does not focus on strict replication of results. Many plants that are not considered traditional dye plants will yield colourful prints, and sometimes, traditional dye plants produce different colours when processed as eco prints. Garden plants, kitchen plants and, where allowed, locally foraged plants may be used, fresh and/or dried. Prints with colours and forms both clearly defined and attractively diffused are produced by this process.
Health and Safety First
The “natural” in natural dyeing does NOT automatically mean “safe” or even legal. Many people are sensitive or allergic in various degrees to different plants; and some plants are dangerous for everyone. You are advised to research plants that may cause you adverse reactions either by touch or smell and to avoid contact with them. I , for example, never use the lovely but poisonous lily of the valley for eco dyeing, even though it is well known among traditional natural dyers as a source of green dye. Many plants contain poisonous substances in lesser amounts that may possibly be flushed away by the dye processes – apple seeds and the pits of the prunus spp. are examples. So I try to increase my knowledge but to avoid potential sources of trouble.
I wear gloves and a mask when handling powders, use dedicated equipment for dyeing (never using them for any other purpose, e.g. for food preparation), avoid the use of the toxic chemicals formerly much used in natural dyeing (eg chrome and tin) and try to inform myself about the poisonous plants in my area. Dye chemicals alum and iron can be safely used if precautions are taken in preparation and handling (e.g. wear a mask). Copper as a mordant or colour changer is a bit more iffy according to some but not all natural dye sources; I am comfortable using it as a colour changer to intensify greens. (Soak copper pipe bits in vinegar to make copper sulphate/copper acetate)
How to eco print (contact print with plants) on textiles or paper
Instructions are for steaming or immersing plants with textiles to obtain an eco print using kitchen equipment solely dedicated to dyeing. They work for wool pre-mordanted in alum, for cellulose fibres pre-mordanted with alum and for paper (cotton rag or plant fibres) pre-mordanted with alum. Microwaving mordanted textiles and papers also yields interesting results, while slower steeping processes (over days or even weeks) such as solar dyeing, composting and rusting work well for contact printing.
I will cover only the basics of steaming and immersing in this tutorial. Solar dyeing and rusting will be the subjects of other tutorials
1. Preparing to print:
Equipment
For steaming: Aluminum, stainless steel lidded steaming vessel with a rack. OR a bamboo steamer over a pot. I like this one for steaming:
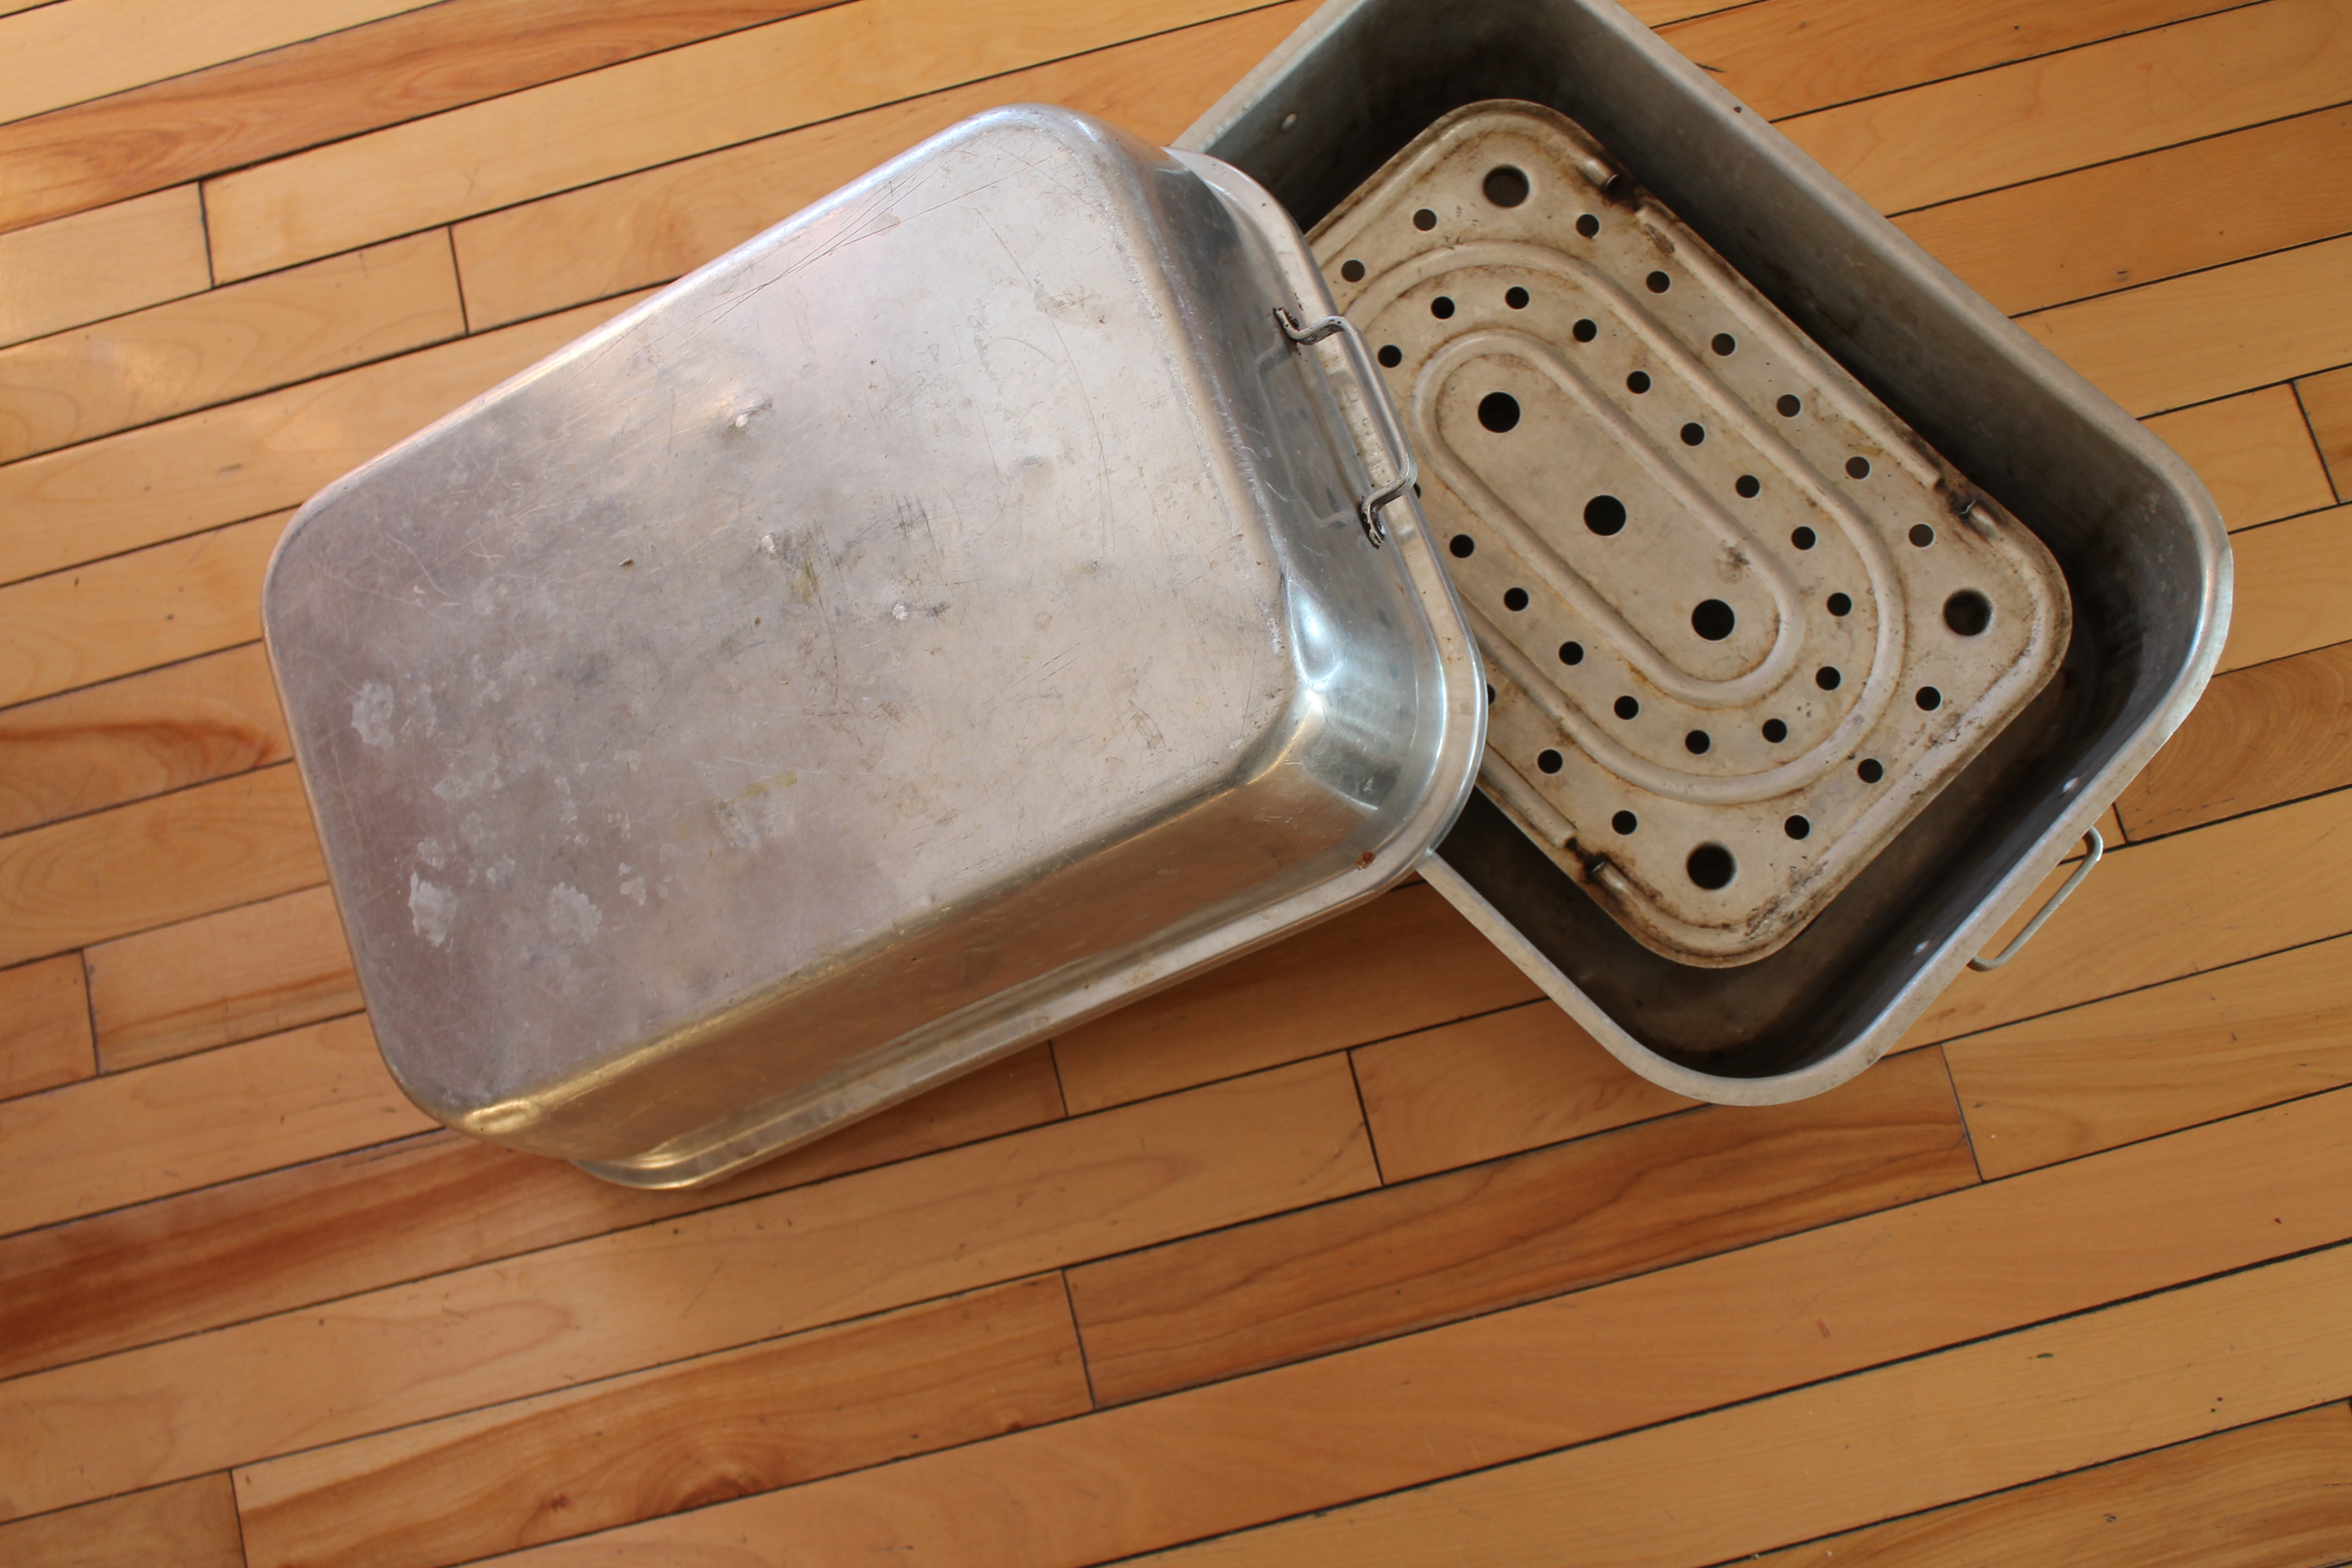
For an immersion dye bath: A lidded aluminum or stainless steel vessel; or a copper or iron pot-as-mordant. (An aluminum, iron or copper pot can affect the dye colour) Here is a selection:

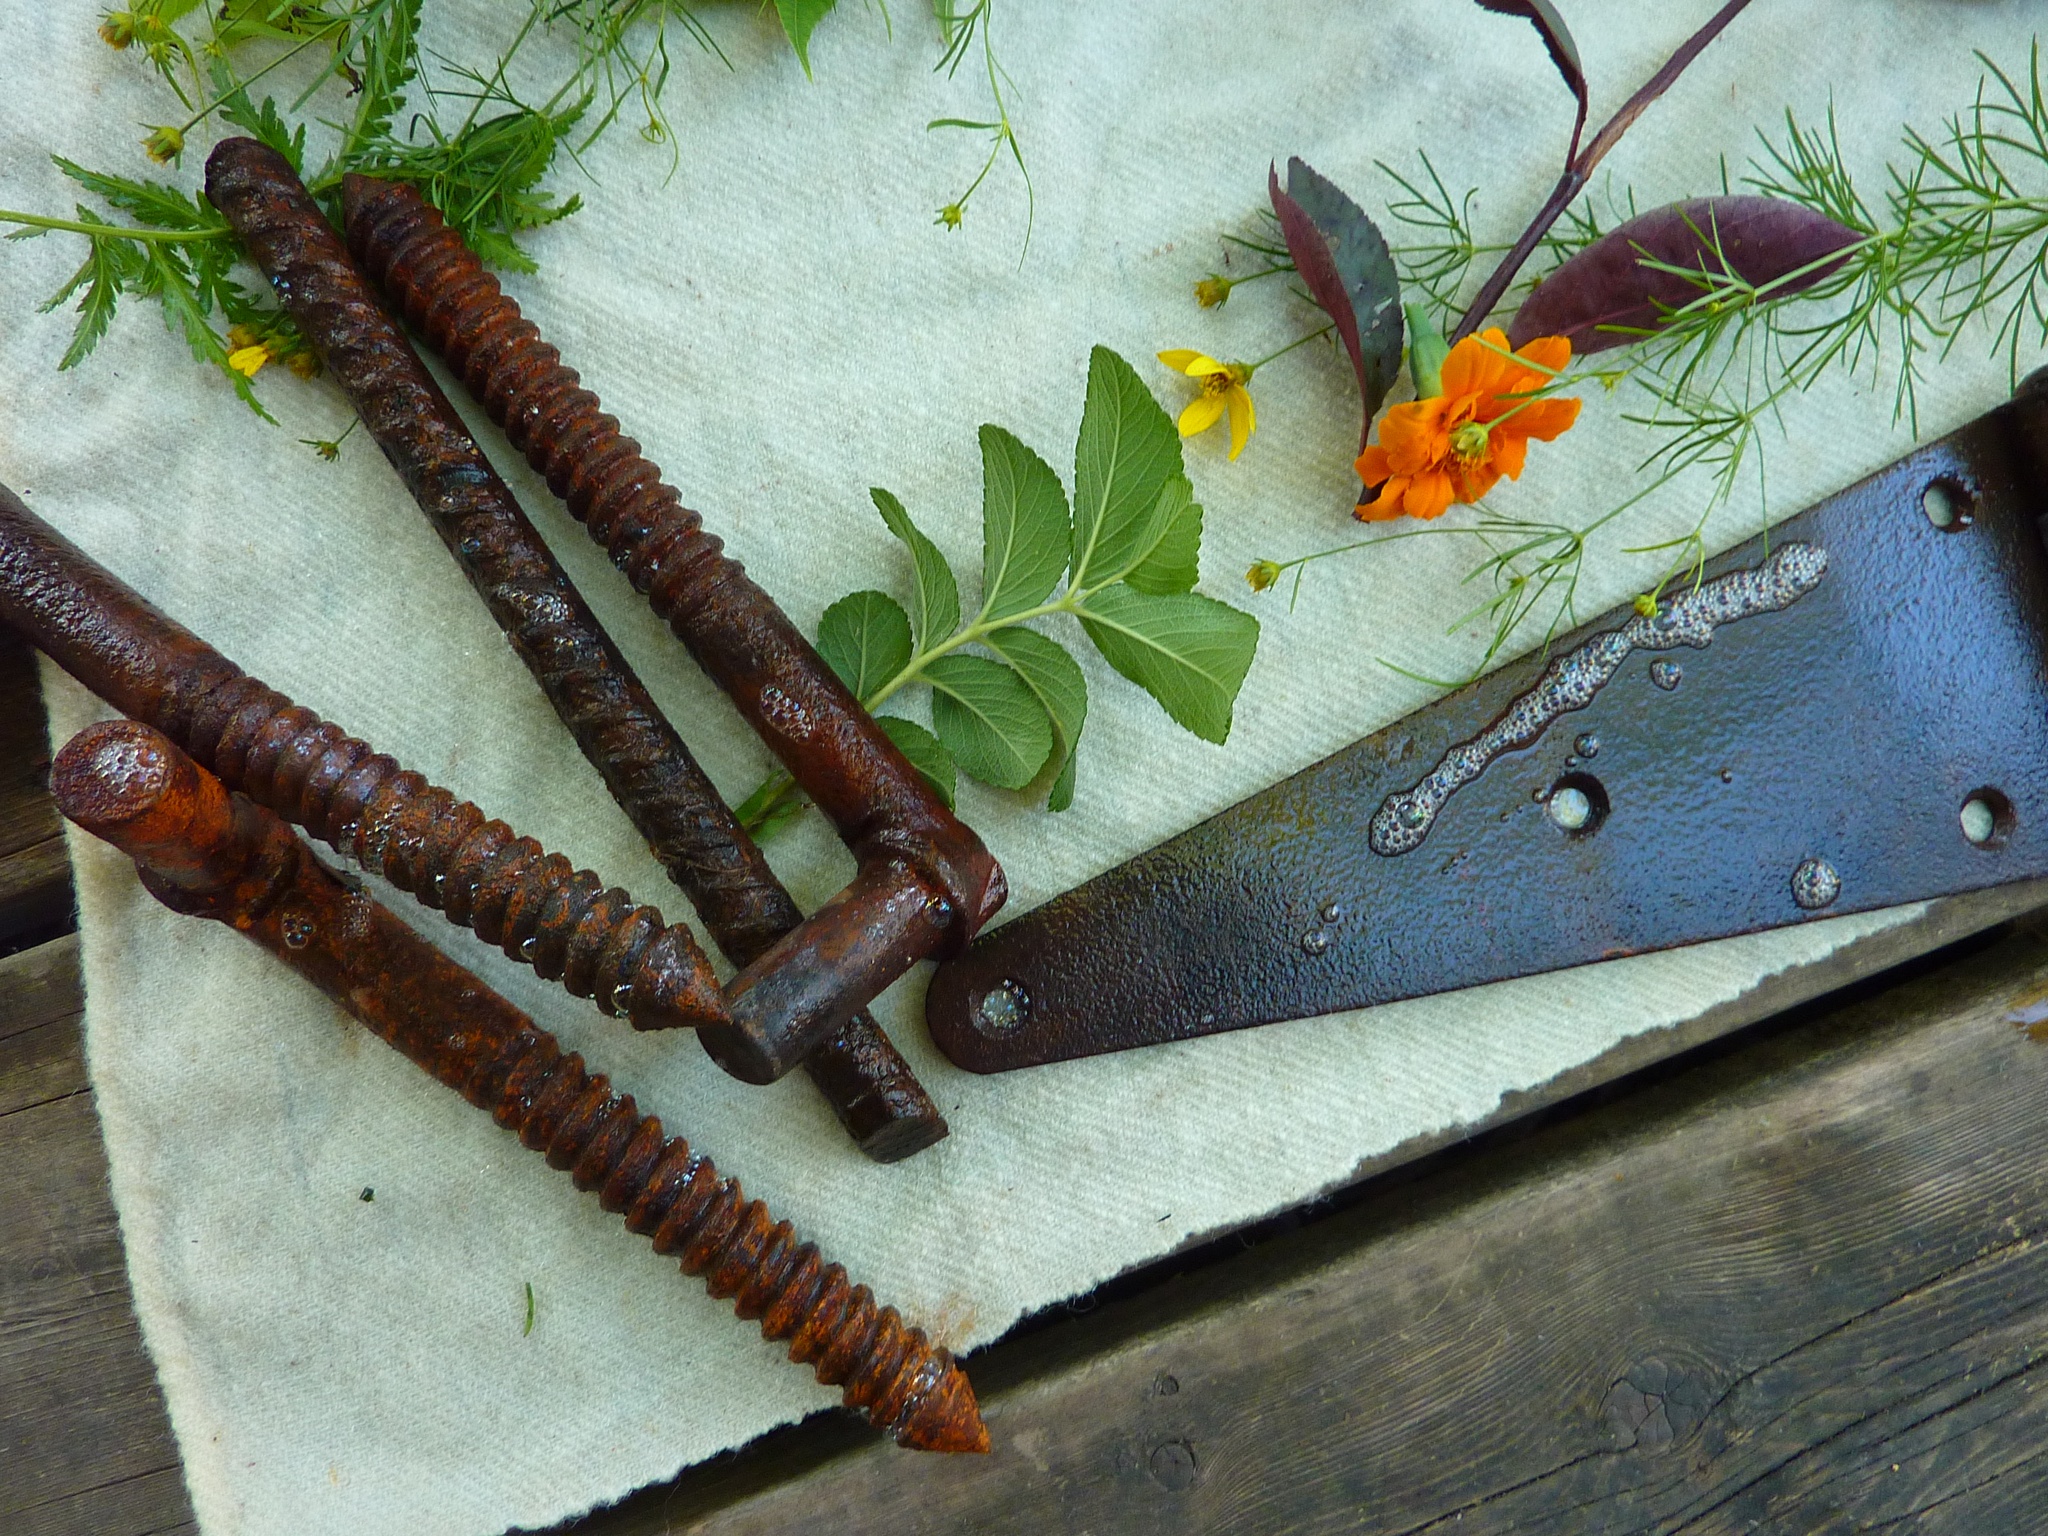
For bundling: Branches with or without bark (for tannin marks); plastic pipe; copper pipe (as mordant); steel rebar, tin cans/ lids, iron/metal bits (for rust prints or as mordant); wooden dowels; cotton string; rocks or bricks as weights. Wooden rods below, copper and bark-covered rods in the image above:

Other equipment: Heat source (e.g.. portable electric hotplate) ; tongs; gloves; facemask; thermometer; vinegar for rusting; iron or rustable metal bits (nails, tin can pieces, etc) kitchen scales; notebook and pen.
2. Preparation of textiles and paper
WOF means Weight of Fibre.
1.Scour textiles in water, hand-hot or boiling as appropriate with Orvus Paste (sodium lauryl sulfate AKA sheep shampoo), Synthrapol or a pH neutral soap such as blue Dawn (‘bird rescue’ shampoo).
2.Use hand-hot water to scour wool.
3. If the cellulose fibre (cotton, linen, bamboo or hemp) is new, boil the fabric for one hour with a squirt of recommended soap to release all the additives, then rinse.
3. Recycled cellulose textiles should also be scoured by boiling to remove all the old laundry products.
4. NO need to scour paper.
3. Mordanting
Weigh the textiles and paper DRY. (I admit that I sometimes make a guesstimate with the papers…)
1. Pre mordant textiles or paper by soaking in water with alum acetate at 5% -10% WOF or potassium aluminum sulfate at 15% -25% WOF. (Note: For eco printing cellulose fibres, I do not use a traditional dyers’ tannin-alum-tannin mordanting process; I reserve this process for traditional natural dyeing. I find the simple alum soak is sufficient to allow plant dyes to attach to the textile or paper in eco printing. You may have other preferences)
2. Soak at least overnight. No need to rinse.
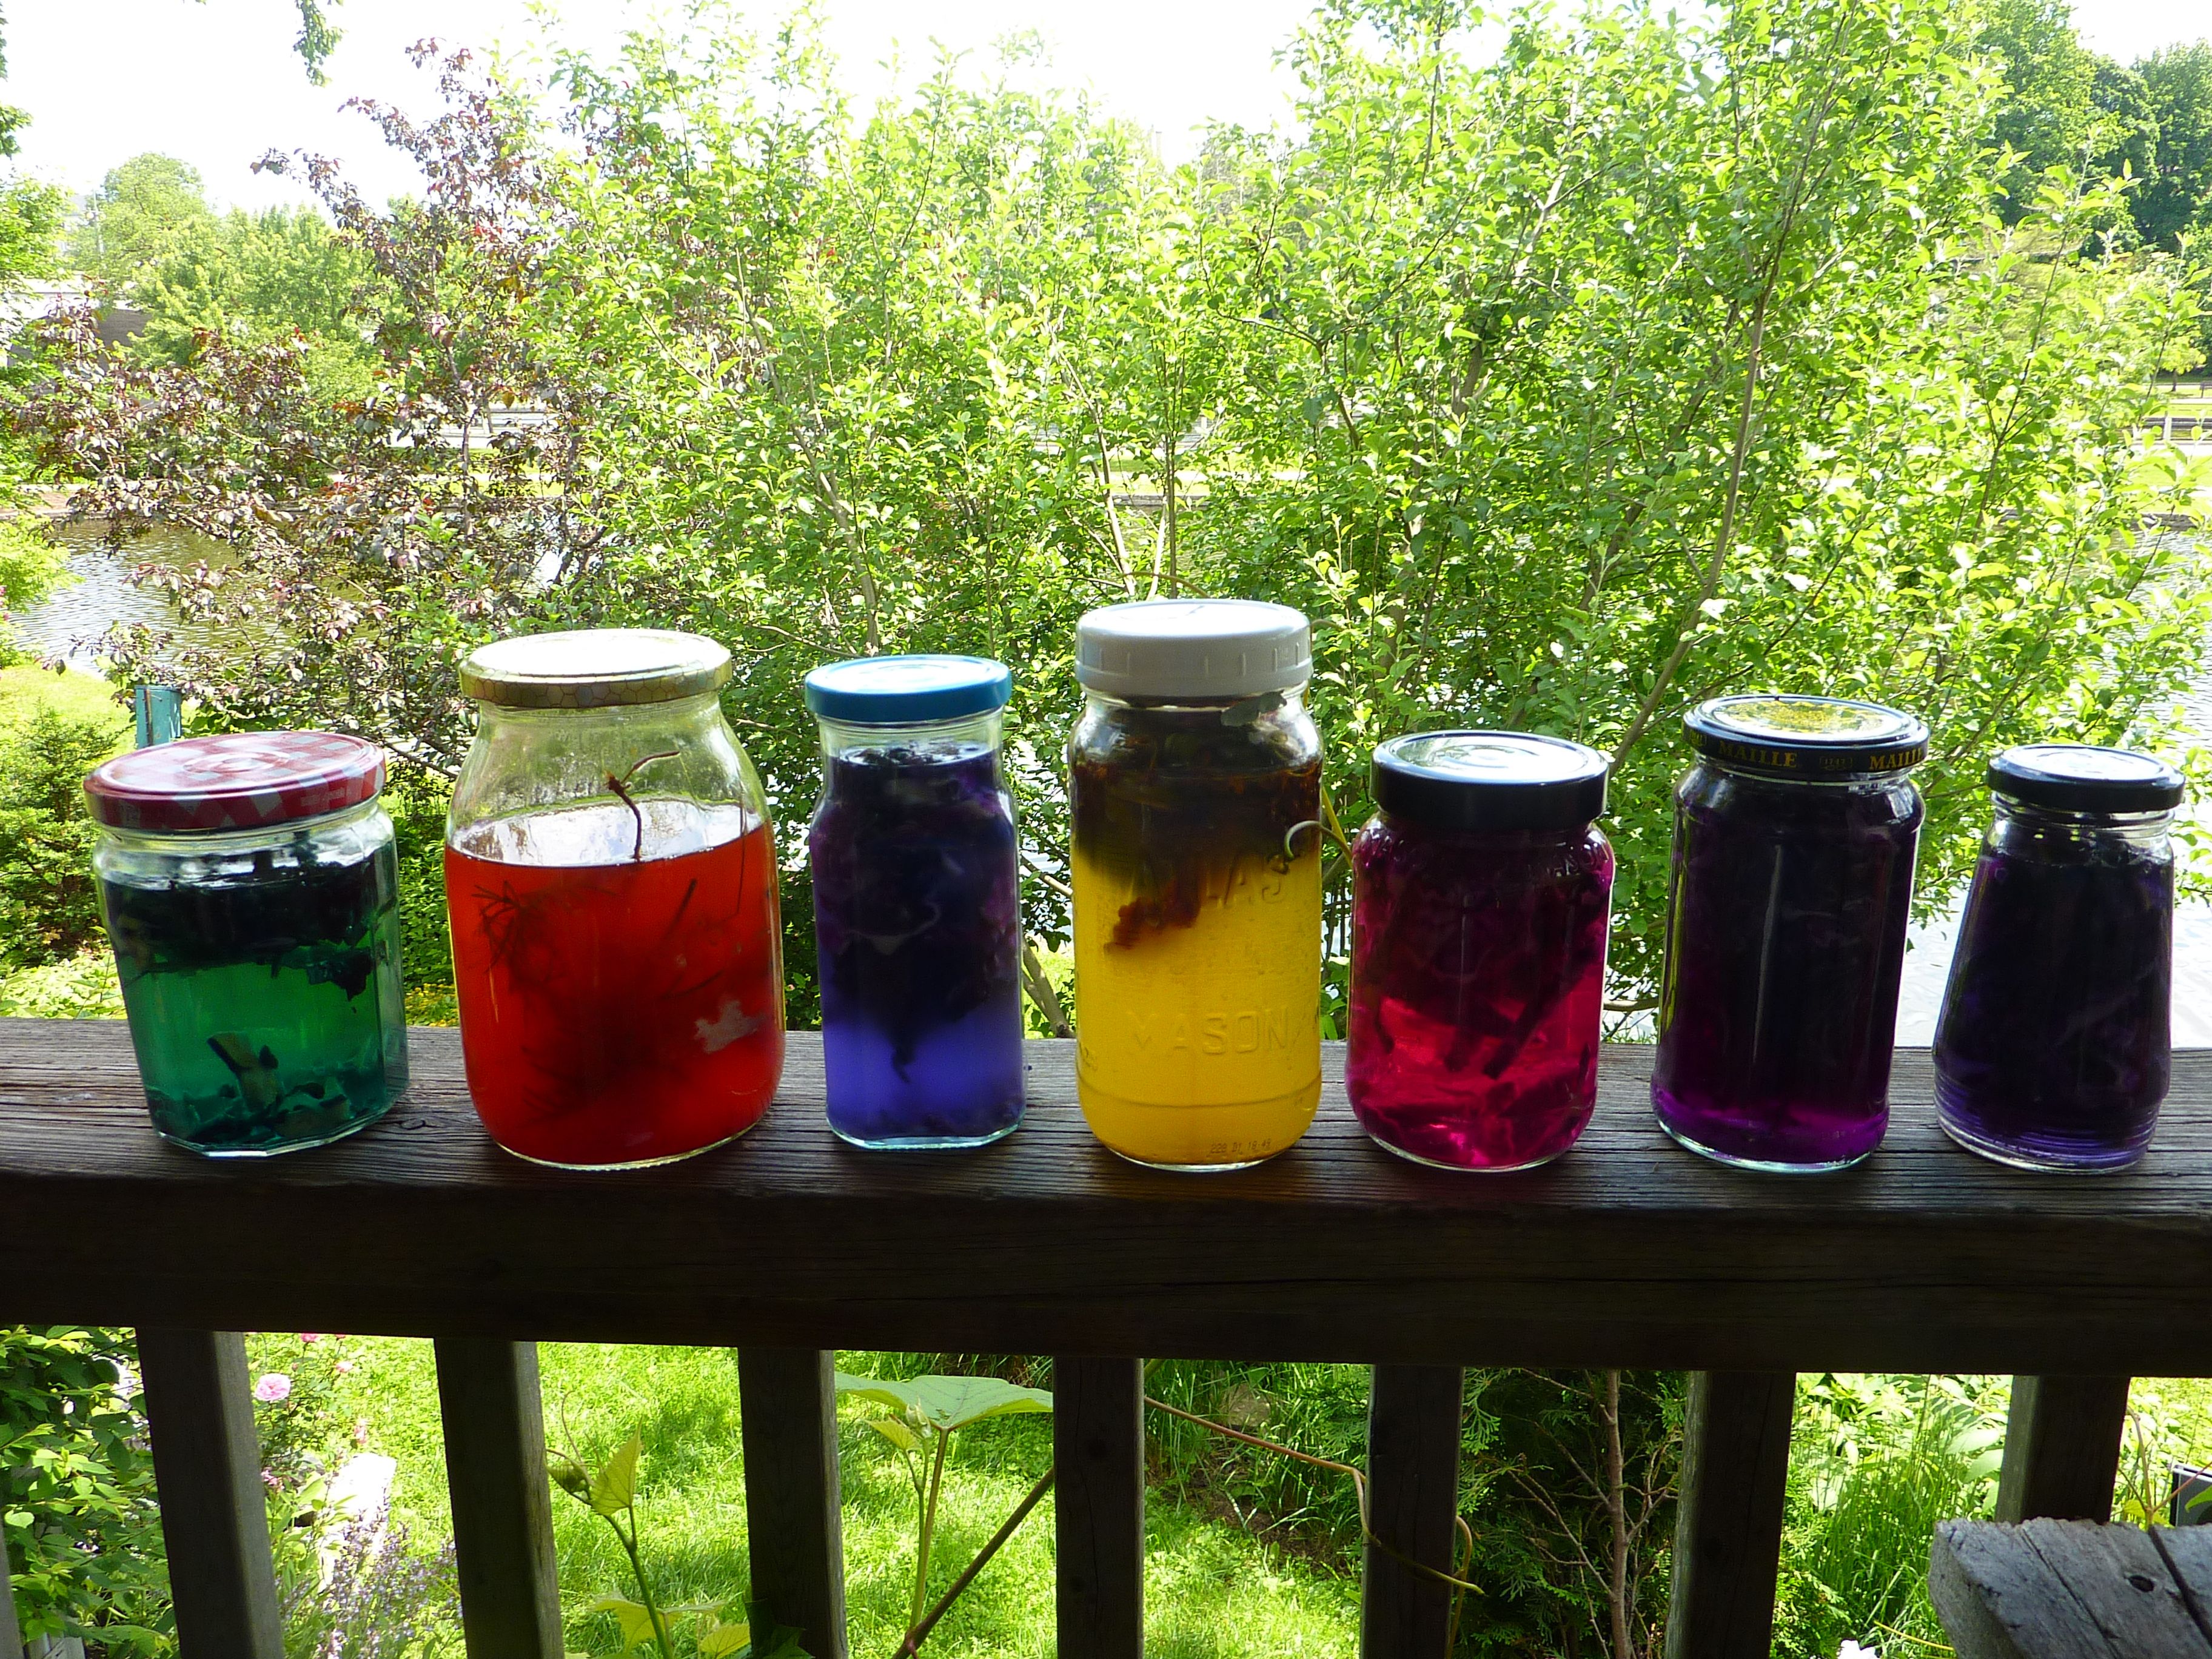
Here is an image of some of the mordants: alum acetate and potassium aluminum sulphate; and colour-changers , e.g. iron oxides (ferrous acetate liquor, ferrous sulphate powder; iron bits) tannins ) and tannin powders; plus some pH papers for measuring water and dyes that change colours based on shifting pH. (I made ferrous acetate with rusty nails or rustable metals soaked in vinegar – in the jar pictured)

4. Arranging and eco printing the plant-textile-paper bundles or stacks
Textile and paper bundles may be STEAMED or IMMERSED in water or dye to obtain a print. COVER the pot!
1. Lay out the wet cloth or paper on a flat surface. Below is a wool panel with native plants laid out; the panel will be folded and rolled. Papers are simply layered one on top of the other, maybe six layers deep.
 2. Cover about 50 percent of the cloth or paper surface with plant material; include bits of or rusty metals iron for rusting areas.
NOTE: The iron oxide reacts with tannins in the plants and gives deep charcoal colours; or if no tannins are present, the iron tends to fix the dye colours or darken them or give the forms greater definition. Ferrous sulphate powder at 2% WOF as a mordanting pre-soak will do similar.
 2. Splash areas of the cloth or paper with vinegar to encourage rusted metal prints.(NB The iron oxides assist the plant dyes to fix)
3. For an immersion dye bath, roll the cloth or paper over copper pipe, tree branch, wood dowel, plastic pipe, etc., folding as needed. In the process pictured below, paper is bundled over copper pipes and immersed directly in the water with dye plants such as sumac berries or walnuts. Textiles can also be processed this way. The outside of the paper or textile will take on the colours of the dye bath; the interior will be printed with the plants that are enclosed.

OR
7. Steam the bundles to extract the dye. Tie the paper or textile stack closed ( as seen below) OR, for a resist print, enclose the textile or paper stack/bundle between can lids, plastic pieces or wooden boards; clamp the bundle closed with binder clips. (Image not shown for this resist process)
Place the paper or textile (OR paper PLUS textile!) stacks on the steaming rack and weight them down:


For steaming larger, thick textile bundles, wrap the plant material tightly in the fabric, tie up the bundle by wrapping the string around and around, then place on the steaming rack and cover the pot. The string gives interesting marks.
 5. Processing the bundles or stacks: Steaming
- Fill the steamer with water to just below the rack. (Put little glass jelly jars under the rack to hold and raise it)
- Place the bundle or stack on the rack.
- Raise the heat and steam the bundle at a simmer (maximum 180° F / 80° C) for an hour or until colour shows through distinctly, usually about two hours.
- Turn the bundle every 30 minutes using tongs.
- Turn off the heat and let rest overnight or longer. (Or not. Open the bundle if you are desperate to look. )
- Unwrap and evaluate.
- If desired, print again one or more times to develop the design and colour associations or to rescue a weak print.
- Sometimes the dye is so strong it prints on the rocks I use to weigh down the stack! Here is Prunus cistena:
6. Processing the bundles or stacks: Immersing
- Fill vessel with water or dye to cover. NO rack needed for the immersion bath.
- Enter the rolled bundles into a cold water or dye bath. If stacking cloth, weigh the stack down with a brick or similar.
- Gradually raise the heat to a maximum of 185°F / 85°C degrees.
- Simmer the bundle or stack for an hour to two hours, turning every 30 minutes and checking for colour. Very thick handwovens might need an hour or even two longer.
- Turn off the heat and let all rest overnight or longer.
- Unwrap and evaluate. Print again as noted.
- If steeping or solar dyeing, simply leave the bundled plants in a glass vessel in the sun for a week or so
7. Developing colours pre- and post-printing
After evaluating, you may want to add other forms or colours to printed areas that seem less interesting. Try some of these and print the bundle or stack again, as before:
Soya milk as mordant: Instead of alum, soak the textile in soya milk or paint soya onto areas, pre-printing, to render fibres more receptive to dyes, especially for dried plants.
Copper sulfate (copper bits in vinegar), ammonia and vinegar can be used as modifiers to shift colours (often towards greens) either by dipping or by painting onto areas.
Iron liquor (AKA ferrous acetate: nails in vinegar) or ferrous sulfate powder can be used pre-printing at 2% WOF as a mordant and post-printing as a dye assistant. Iron bits, when bundled with the plants, can act as a co-mordant with alum and to shift colours in areas of contact to darker values. As a post-print dye assistant, iron can reveal hidden layers or promote overlapping ones: a wimpy print will often “pop” after an iron dip. The iron acts by greying or greening or deeply-darkening the print.
Tannins occurring naturally in tree bark and in certain leaves (e.g. Rhus typhina/sumac) contribute both fastness and deeper colouration to neighbouring prints. Tannin-rich seedpods like catalpa, green fruits from black walnut and twig barks from prunus species or sumac make strong direct contact prints and help fix nearby colours. Prunus cistena even prints on rock! When bundled into textiles with iron bits or dipped in iron liquor post-printing, tannin-rich leaves or barks from maple or sumac produce dramatic black, deeply greyed or even blue-greyed prints.
Dye powders
You can paint on dye powders that have been dissolved in water or sprinkle them on (see below)
Immersion bath
Immerse the eco printed bundle in a dye bath in a colour of your choice and process (see above). Use plants or dye powders to obtain your colour. For instructions for dyeing with dye powders, see the Maiwa site (see References below). For dye plants: be adventurous!
8. Other dye extracting processes:
Solar dyeing is really fun. Add a teaspoon of alum to a jar of water, fill it with plant materials bundled in cloth or paper and leave in the sun. Below are red cabbage (amended with ammonia and vinegar to shift colours) and coreopsis (orange-reds) dyes. In our local water, acids (e.g. vinegar) shift the pH to reds and magentas; alkalis (e.g. ammonia) shifts the basic blue dye in red cabbage to greens and teals
9. Using Dye Powders
I buy dye powders of plants that are not native to my area and that I can use to create special effects on textile or paper. Usually, I sprinkle the dye powders on; I can also paint them after dissolving them in liquid. Pre-reduced indigo as powder gives nice effects this way.
 Dye powders on silk, without eco prints:
10. Finishing
Rinsing
Dry the printed cloth and cure at least a few days before final rinsing.
No need to rinse papers.
Rinse cloth in plain water without soap. Some colour will normally wash out.
Dry, press and store or display out of direct light
Light and wash fastness
The standard practices for naturally dyed handwovens apply to rendering eco prints wash- and lightfast.
Faded prints can be eco printed again!
The standard practice for establishing dye light fastness is to expose the dyed materials to strong sunlight for about a month. Attach cardboard to cover all but an inch of the dyed material; each week thereafter, move the card an inch or so to reveal a new portion of the dyed fabric or paper. Mark the dates on each exposed section. Eco dyeing and printing are still experimental processes so lightfastness information has not yet reached canonical status!
11. Recordkeeping
Record dates, textile type, mordants, plants used, extraction method, results obtained, etc. (I like to make Artist’s Books with my printed textiles and papers for keeping dye records).
12. Environmental Law
In some countries or regions collection of material from the wild, including plants, bark or lichens, is regulated by law. Please be aware of, and adhere to, the law in your country or region.
13. Toxicity of plant materials
If you are experimenting with any plant material ensure that you are aware of all issues related to toxicity in handling and processing individual species. A useful reference for poisonous berries, for example, is published by Lone Pine in “Wild Berries of Ontario”.
14. References
Cardon, Dominique (2007): Natural Dyes: Sources, Tradition, Technology and Science, London: Archetype Publications.
Diadick Casselman, Karen (1993): Craft of the Dyer, New York: Dover Publications, Inc.
Chambers, Fiona Hammersley and Cory Harris (2012): Wild Berries of Ontario, Alberta: Lone Pine Publishing.
Dean, Jenny (1999): Wild Colour: The Complete Guide to Making and Using Natural Colour, New York: Octopus Publishing Group, Ltd. Random House.
Flint, India (2008): Eco Colour: Botanical Dyes for Beautiful Textiles, Colorado, USA: Interweave Press.
Kadolph, Sara J. and Casselman, Karen Diadick (2004) In The Bag: Contact Natural Dyes. In Clothing and Textiles Research Journal 2004. http://ctr.sagepub.com 22:15.DOI 10:1177/0087302X0402200103. [accessed 1 January, 2013]
McGuffin, Nancy J., Ed. (1986): ‘Dye Plants of Ontario’. Concord, Ontario, Canada. Burr House Spinners and Weavers Guild.
Richards, Lynne & Tyrl, Ronald (2005): Dyes From American Native Plants: A Practical Guide, Portland, Cambridge: Timber Press.
Websites
http://www.wendyfe.wordpress.com
About the author
Of Orkney heritage, Wendy Feldberg is a fibre artist now living in Ottawa, Ontario. Wendy works in contact printing with natural dyes from local plant pigments for her embroidered textiles and Artist Books.
———————————————————————————————————-
Tutorial 2
Leaf Monoprinting by Cassandra Tondro
Cassandra Tondro’s online tutorial on extracting natural dyes from leaves to obtain a print.
Cassandra calls her end product a “monoprint” . Cassandra is a “Green” artist living in California. She has been making leaf monoprints for about four years. On her blog, she also posts about eco prints.
She has graciously allowed me to link to her tutorial.
Leaf Monoprint Process
http://tondro.com/blog/category/leaf-monoprint-process/
__________________________________________________________________________
Tutorial 1
Rust and Plant Printed Artist Book (modeled on my Artist Book “Botanica: New World Scroll 1 “
Eco Printing with Rust and Plants
Introduction
My artist book “Botanica: New World Scroll 1” is made from papers eco printed with rust and plant dyes as a contemporary take on traditions of natural dyeing and bookmaking. Object and process both invite us to slow down and savor making, handling and viewing a beautiful book, to appreciate a book’s tactile and visual pleasures as well as its intellectual ones. Historically, the first books were scrolls, sometimes pleated or slatted, objects of reverence treasured for both content and form. My book’s accordion and pamphlet-stitched structure printed in contemporary style on watercolor paper creates living links to a rich past.
To make my book, stacks of papers were layered with leaves and metals, sprayed with vinegar and water to rust the metals, then steamed over boiling water to extract the “eco” prints. Plant pigments combined with rust to deposit prints directly on the paper in a range of greys, charcoals and blacks as well as natural rust and plant colors.
The process of eco printing papers offers artists many creative options. For eco printing projects other than bookmaking, try stacking papers six sheets high and sized to fit your steamer, and then follow directions for processing an eco printed book.
Tools and Materials to Make an Eco Printed Book
For the book pages
- 6 pieces of 140 lb. watercolor paper, 4” x 8”, folded in half to make a section 4” x 4”
For the book’s spine
- 1 piece of 80 lb. or 90 lb. artist paper, 4” x 24” folded into an accordion with 16 panels, each 4” x 1 ½”
To print the papers
For the spine:
- Loose black or Rooibos tea leaves (dry)
- Flat, scrap metal pieces
For the pages:
- Tannin-rich leaves such as maple, chokecherry oak, sumac, walnut, etc. (“Botanica: New World Scroll 1” is printed with fall-gathered Red Maple (Acer rubrum) and Chokecherry (Prunus virginiana).
- Flat metal pieces
To develop the rust
- Spray bottle filled with 50-50 mixture of white vinegar (5% acid) and water
To stitch the book sections
- Linen or other strong thread
To steam the prints
- Covered cooking vessel (e.g. an old meat roaster) filled with three inches of water and fitted with a raised rack, large enough to hold the papers (Safety note: Do not use for food preparation)
To enclose the papers
- Four pieces of cardboard, each 4” x 4”, two per stack of papers
To weight the papers
- Bricks, rocks, heavy ceramic dishes (to ensure close contact between paper and printing materials)
Source of heat
- Kitchen stove, portable hot plate, camping stove, etc.
Tongs and gloves for handling hot materials
Technique
To print the papers
- Make two stacks of papers each with three sections folded 4” x 4”
- Insert two or more tannin-rich leaves and a small flat piece of metal inside the fold of each section and also between each of the sections in the stack (I used maple and chokecherry leaves for their contrasting shapes)
- Spray –soak the stacks with the vinegar-water mixture.
- Place one piece of the 4” x 4” cardboard under and one on top of each stack.
- Wrap the stacks around with cotton string and tie securely.
- Place the two stacks side by side on the steaming rack
- Place the weights on top of the stacks
- Bring the water in the pot to a boil and steam for 60 – 90 minutes
- Turn the bundles every thirty minutes. Steam longer if the desired print is faint, shorter if too strong.
10. When complete, turn off the heat and allow the bundles to rest in the pot until cool or overnight
11. Unwrap the bundles, discard the plants but reserve the metal pieces for other prints.
12. Spread the papers out to dry. Remove stuck-on plant material
13. Once dry, flatten papers under weights.
To print the accordion spine
- Insert dry tea leaves between all the folds of the accordion; insert pieces of metal also inside a few of the folds.
- Spray-soak the spine with vinegar-water
- Tie with cotton string and steam as for book papers
To assemble the book
Write the names of the plants in English and Latin on the spine with black and/or gold archival pens
- Insert one 4” x 4” folded section into the second “valley” fold from one end of the accordion
- Stitch the section into the spine using linen thread and a pamphlet stitch
- Repeat with the other five sections
- Make two book covers (front and back) using 4” x4” eco printed end papers, textile and bookboard
6. Using PVA glue, encase each end portion of the accordion spine between an end paper and a textile-covered book board. (See image for ideas)
For more information, see the Resources section.
Tips
- To help fix the colors, pre-soak papers for two hours or overnight in a solution of one teaspoon of alum acetate or potassium alum sulphate to four cups of water.
- Rusted metals alone print colors in the orange-rust-brown range on papers.
- Leaves may be layered on top of rust printed papers and processed a second time. This method tends to print tannin-rich leaves as black on top of rust.
- Leaves printed alone without metals tend to print colors depending in their growth season: greens, blues, purples, yellows, browns are common
- Natural dye powders can be sprinkled onto papers or diluted and painted on selectively, as can plant inks such as walnut
- Dye assistants such as ammonia, cream of tartar, iron or copper sulphate can be painted on selectively to induce color shifts.
- Spray papers with a deacidifier on completion of the project.
Resources for bookmaking and natural dyes
- Alisa Golden: “Creating Handmade Books”
- Shereen Laplantz: “Cover to Cover: Creative Techniques for Making Beautiful Books, Journals and Albums”
- For a complete line of supplies and information related to natural dyes, dye assistants and reference materials, see www.maiwa.com
- Jenny Dean (with Karen Diadick Casselman, consultant): “Wild Color: The Complete Guide to Making and Using Natural Dyes”

where have you been? Love this.
Will be posting more tutorials later this year, Jeannie. Thanks for the visit!
Gracias, gracias, gracias por ser tan generosa!!! HERMOSO!!!
De nada, Marta!
This is so inspiring, and i have Shereen’s book from years ago when i taught handmade
paper…..and have been eco printing for the past five or six years. Why I hadn’t put these together is a mystery, but apparently I now have yet another path to travel on….my worry is that I don’t live long enough to use all my supplies…lol
Welcome to the “easily distracted” club, Cedar! Eco dyeing/contact printing carries you down a lot of different psths, for sure.
A wonderful resource for a beginner like me! 🙂
Feel free to send Cassandra a word of thanks – her tutorial is really great!
Hi Wendy, I just did! I am so grateful to both of you for offering such wonderful resources and educational tools for anyone who wishes to learn the art and craft of eco printing and dyeing.
This is great. Thanks so much for sharing. I live in the Sonoran Desert so I’ll have to experiment with what nature provides here.
Let us know what Nature provides there, Karen!
Hello, I’m fairly new to botanical eco printing on silk scarves and cotton fabric. I have tried several techniques from different people and I’m still not getting the results I want. I have a feeling it has to do with location, plant material and acid/alkaline water and soil. Is there a tutorial on working with fabric instead of paper?
Hello Linnae
I will post a tutorial soon on eco dyeing/printing on fabrics. Meantime, if you want to buy a magazine, you can get full instructions in an article I have written for the Journal for Weavers, Spinners and Dyers, a UK magazine; you can order it online, the summer 2014 issue.
The technique is the same for fabric as for paper. make sure you get firm contact between cloth and plants, plus pre mordant with 5% alum acetate to weight of fibre. Weight the bundle or stack very well – I use a ceramic dish on top of the bundles usually sometimes with a brick in the dish
Good luck
Wendy
Thank you…I’ll look for the magazine online. I’ve been steaming bundles or rolls on pvc pipe. Haven’t weighted them. Thanks for the 5% alum…I’ve been guessing.
Linnae
You can increae the alum ; 5% is a starter amount. Try also 2% iron liquor or add iron bits to the bundle or buy powdered iron , ferrous sulphate. You can also paint on the iron liquor selectively,either before printing or after. Mixing leaves and flowers helps, too, esp. If the plant is tannin-rich. Tannin, iron and alum are your bundle buddies along with firm contact
W
Excuse me, Lynnae! i was thinking botanist..hence the ‘linnae’…
I figure it is the American spelling…..I’ll be unbundling 3 scarves to see how they did fairly soon. I steamed them and let them cool and I’m wondering if I should let them set a few days before unbundling. Didn’t think about pressure on top so will do that next time. I sprintzed with vinegar and used the Alum water in the steam….I’m experimenting. I have some really great yellow scarves from the last batch of soaking in alum water then steaming…which I will need to do again to get prints!! I pulled the string really tight this time when binding. Part of the issue now is the main plant blooming is Chamisa which is yellow. Next year I have plan for a more extensive dye garden. It’s raining in New Mexico…which isn’t that normal for this time of year. So, I’m waiting for it to clear a bit….then we’ll see! Some people tell me to let them set or soak for days or weeks and I didn’t find that to do much. Thanks for all your thoughts!
With the silk scarves I’ve finished by steam pressing when dry…letting them set for a few days, then washing in gentle soap and a vinegar rinse. That’s where I lose quite a bit of color. With paper there is no washing/rinsing and I can see how that would be much more colorful.
If I may add?!… I let my silk scarves cure for at least a week before a gentle rinse with a drop of Woolite. Absolutely no colour loss. I think the vinegar may be the culprit.
Hello Rita
Thanks for sharing your experience with modifiers and wash/rinse agents. Vinegar is a questionable chemical to use for keeping colour safe. My experience: I do not use it as a rinse agent because with natural dyes, it changes the water pH and that can, in turn, can change colour, when the dye is pH sensitive. I am not sure if vinegar causes dyes to leach out. The most likely explanations are 1. Dye molecules act like cars in a parking lot – when the lot is full, no room for the extra cars…so they move off. 2. Mordanting effectiveness – use the right mordants and processes to get a good attachment of dyes…Vinegar also promotes rust for rust prints. So I tend to use vinegar for its properties related to colour-making. I never use Woolite. I use Orvus paste or Blue Dawn detergent or Ivory liquid because they are used as animal rescue shampoos so are pH friendly
I find that presoaking the fabric in the alum water gives better results than spritzing during. That owrks best for silk. For cotton and linen, it is often best to do three soaks- in alum- tannin- then alum again, no need to rinse in between.
May I just check with you that alum potassium sulphate will fix colours ok on paper, even though paper is made from cellulose fibres? I’m hoping to avoid alum acetate as I believe it is a fine powder and I hate wearing dust masks and the like.
Yes, Eve, both kinds of alum will act as mordants for paper, AKA cellulose fibre.
Caution, though. Even PAS will give off fine powder. You can experiment without alum. Some plants do not appear to need any mordant in this technique. The plants that are considered sources of substantive dyes in traditional natural dyeing will do OK without alum. As for “fixing” – alum will not necessarily fix the colour for ever. Fading can occur. But that depends on a number of variables. Discussion for a another time in a blog post. Be ready to re- dye or over dye. You can try 2% iron to WOF, liquor or powder, as mordant. The iron canndarken the colours a bit.
Good luck. TRy mixing the alum with water inside a big cardboard box with a hole cut in it like a kitty pee pee house…
That’s great, thank you so much for generously sharing your info. I’ve been a natural dyer for ages and have just recently discovered eco printing and starting to experiment. Such fun! It’ll keep me out of mischief for hours! I might try copper as well, I believe it’s good on veg fibres although I expect it will change the background colour a bit. Many thanks again, super website/blog.
Copper works, too, though I find not as dramatically as iron. Ammonia, too. Using the various modifiers, try painting areas of your printed cloth or paper after dyeing, and before dyeing as well; you can also selectively paint the plant materials themselves, as opposed to the cloth or paper, and before steaming.
Eco i thought was shotened from ecological .Eco dyeing ,Natural dyeing..Your page is full of non ecological toxic things ..Powder dyes amonia mordants .copper and aluminium sulphates .are very toxic ,We dont cook in them any more most hot water pipes are no longer copper .
There are books available on Eco dyeing using natural bark leaves flowers etc collested from around you that is far less hazardus than what is recogmended here .India Flint from aust has some excellent books out and does work shops all over the world .
People think because these minerals come out of the ground they are safe
Thank you for the commentary, Peter. You raise a number of debatable points on the subjects of “eco” and toxicity of plants and mordants. I have explained my use of the epithet “eco” throughout the blog so frequent readers might realise that it means many things and no common understanding is available at present among natural dyers. Alum is not toxic per se, and certainly not unsafe if used as I and other dyers direct. It is a mordant, a metallic salt, and has been used for centuries for helping dyes bond to fibres. In fact, today, one can buy potassium alumininum sulphate in food stores ( people use it, among other things, for keeping pickles green). Some eco dyers elect not to use mordants, as you point out ( of which alum is one) that is their choice. These days, indeed many dyers are aware of eco issues so that now, it is normal for dyers (as far as I can tell from research)to elect not to use chrome or tin as mordants which are not regarded any longer as safe to use. The use of iron and ammonia is safe of used as reported on my pages and in the references. Do browse. I would be glad to answer any questions you have.
Good day!
I apologize for the errors in the text – I write with the help of an interpreter.
First of all, thank you for what gives technology! I see that is not alone in expressing gratitude. And it’s very good.
I am engaged in the eco-print recently, any information analyze what suits me – I want to do. I want to learn to get a predictable result on cotton. Silk and wool dyed quite simple. I am using alum or rusty water. I make good prints, but there is always something to strive for.
I wish you success!
Thank you for your interest and your visit! I recommend also thsaid blog of my friend, Elena Ulyanova in Kherson. She blogs at The Importance of Procrastination
Good luck in your new work!
Wendy
Thank you so much for this tutorial. I have been researching at the library but your site is the best for information on how to do this printing on paper! I begin to experiment next week.
Good luck with your prints, Dot! And thank you for your comments
Good morning, fantastic blog unusual information. Many mysteries explained. I started my adventure with the recently ecoprinting I’m still learning. My effects are less spectacular but because your information will make them grow.
Congratulations achievements!
Milada
Thank you, Milada! I wish you success in your eco print adventures
w
Thank you for sharing your passion and knowledge. I took a two day Eco Printing workshop at Fiber College, Searsport, Maine with Amelia Poole from Maine. I thought I died and went to heaven. This technique made me fall in love with my gardens all over again. I am sad that it is Fall here in Maine and I won’t be able to experiment with my plants much longer. I love your site! Once again, thank you for sharing!
Thank you, Christine! Lucky you, taking a class with Amelia. Her workis lovely and her “ethos” admirable. Good luck to you in your adventures. Dry some plants and freeze some of the same this winter and see what lovelies appear from the winter bouquet. There is always the fridge (red cabbage, carrot tops), the green grocer’s and the florist…and under the snow, too – perennial geraniums, for example. Hope you report your doings
Wendy
Really informative thank you:-)
Welcome, Nikki!
hello! i am studying textile design at the moment and hoping to pursue it as part of a degree- i found your tutorial amazing and so much clearer than others on the internet, thank you! i was wondering what fabric you used for your ego dyes? if I’m going to invest in a fabric i wanted your opinion on what would be best to bring out strong dyes as I’m doing to use it as part of a portfolio! love your work by the way!
many thanks, hannah
Wool and silk take the dye very well, and are easier to work with than cotton or linen or hemp. If possible, use second hand wool or silk, very well washed and rinsed to remove all laundry product build up. Good luck!
thank you very much for your help!
Take a look also at my list of references – I have learned a lot from the authors, as well as from my own experiments
What can I say but just superb reading also love all the comments so a giant thank you to all
Thank you, Llewena.
Thank you for this Blog. It is very informative and helpful. I love eco dye printing and your suggestions have helped me along the way. 🙂
You are most welcome, Diane
I’m interested in Eco deying. The article give great information. Thanks.
Je t’emprie, Lia!
These are great tutorials, thank you. I have been doing rust dyeing on fabric, moving on to eco dyeing which is a lot more complicated. Having read your tutorial I am going to try on paper to use as a background for monoprints. I have a drawer in my freezer full of leaves/berries etc just waiting to be used! Love it!
Good luck,Meryl! Yes, the plant dye prints require a lot more study and experiment – but are great for the ” What If? ” in you!
Wendy
Not only a great tutorial for eco print, but your beautiful work is an inspiration as well! Each time I google I come back to a different page on this site and get another eye opener.
I just unrolled a batch of prints on silk and some of them could use some help with modifiers, which I haven’t tried before. I soaked some of the leaves in vinegar – some were soaked way too long and lost their colour too – so overall it’s an acidy bunch of prints with some nice reds I’d like to keep (or not to lose) but need some definition with a light touch. I was looking at recipes for alkaline modifier and read somewhere that 5-10 ml of ammonia per 100 ml water is good. Also have some ferrous sulphate and read that 1/2 tsp per 100 ml water is the recipe for a dip but it seems like a lot of FeS to me, as the tiniest pinch will change a full dyepot.
Also wondering about the steaming after modifiers have dried, whether a full hour is needed and worrying about losing the anthocyanin reds by overheating.
Finally dithering about whether I could moisten/iron these without a full rinse, just so I can see through the wrinkles at what I’m doing. Or perhaps wait a few days before modifying? Only two days since these were steamed. TIA for any advice, I love this process and it is such an adventure. 😀
It is good to know that the info on my site keeps being helpful, Steph. The recipes for amounts of modifiers are by no means ” canonical” if you get my meaning. I agree that one is better off to start small with a tiny pinch or spoonful and work up, all the while keeping notes. Note the other variables operating in the dye pot – type of fibre (protein, cellulose) heat, water content, process time, other dyes and their chemical constituents- all have their influences – singly and in collaboration with each other. Juggle the variables by all means but keep careful notes of all the actors appearing in your dye drama of the day! Take an experimental approach. Yes certain colours can be lost by overheating or remain undeveloped by underheating. You will only know by trying the different options. As you said, it is an adventure and you have to write your own guide book eventually.
Thanks, Wendy, for good advice. I’m trying to keep better notes, but with many actors I still end up with a question mark. I could answer some questions with an experiment or two, so that’s what I’ll do.
I hope you are well, and keeping best wishes for you and Shlomo in my thoughts.
Hi Wendy,
I have been ecoprinting silk scarves for awhile now. I was getting alot of autumn palate colors (orange, brown and green) and wanted to get a wider range and more intense colors. I purchased some dyes from Maiwa which have been fun to experiment with. My questions is: How do I get the dye color to permeate the whole scarf? I bundle it around a PVC pipe and only the ends of the scarf take on the color.
I tried a Lac dye recently with a variety of leaves including maple, cotinus and eucalyptus bundled inside. I pre-mordanted with alum and spritzed the scarf with vinegar water. There was a faint pink color on the outer border of the scarf and the ends. The rest of the scarf was colored just from the leaves. I tried tossing the whole scarf into the dye bath. I lost all the pink color and it turned the leaf prints a deeper orange/brown.
I’d really appreciate some advise. Thanks,
Irma
A lot of questions in your text here, Irma. Good you are experimenting! are you keeping good notes and taking pictures?
I label my samples with the notes written on them to explain my results. No way you will remember otherwise.
For other colours besides the autumn range, you need to research the plants that yield those colours you want. (FYI: Lac dye is from insects not plants. Vinegar is an acid and its job is to alter the pH of the water/dye. When you alter pH you trigger changes in colour. See my blog posts on using red cabbage with vinegar to obtain different colours, as an example. Do not go around throwing vinegar on stuff unless you know what it will do – or unless you are simply experimenting…I do not use Lac but I know that insect dyes such as cochineal are extremely sensitive to pH changes ) …as for bundling around a pipe: the aim of that method is to have some areas dyed and some left the original colour. Overall colour should happen in immersion dye baths. Nothing to stop you from dyeing a cloth two or three times to get the colours and the variations you want. That repeated dyeing is what natural dyers have always done to increase colour intensity in an immersion bath. Colour intensity in eco printing comes as a result of the right amount of heat, processing time and contact pressure between plants and substrate. Take a bit more time and do some slow and careful reading of the best practices by known eco printers.
Am new to Eco dyeing and am currently doing an online course with Nicola Brown this is a great tutorial many thanks will follow with interest would like to find out the basics for steaming Eco prints in a microwave
I have not used the microwave for eco printing, Sue. You are on the brink of becoming the expert – that is how on becomes expert anyway, with a question nobody can answer to your satisfaction – thus you do the work!
wendy
Thanks Wendy will give it a try!! Just wasn’t sure if I would need to try to ‘cook’ it for ages or briefly but I should soon find out!!
Just found thiese tutorial s. after yet another failed attempt to get leaf imprints. Am getting colours from plants coffee etc but fail to get impressions I can’t see I’m leaving anything out 😔 But won’t give up. Will follow step by step these tutorials
Hi Debbie,
Tips:
1. Use plants known to give reliable colour – check my plant list for ideas
2. Wrap TIGHTLY and WEIGHT down.
3. Repeat that tip! Very close contact between substrate and plant
4. High heat, lots of continuous steam.
5. Use fresh plants for your experiments where possible. When you know more anout how the fresh ones behave, try dried.
6. Leave cooking for at least 30 mins – up to an hour in most cases
Good luck
is it possible to have plant dyes with same method on cotton fabrics as well ?
Yes, Pramila, it is. BUT you must be sure to scour the cotton fabric very well to remove all susbtances from laundry, etc. using soda ash and boiling water to remove the built-up substances. Then prepare as for dyeing as for linen. You will get different results on cellulose fibres (like cotton and linen) than on protein fibres (wool and silk) so follow common natural dye preparation for each. Consult a reliable dye prep reference manul for more details. As usual in eco prints, ensure close contact between plants and fabrics. Good luck!
Thank you…will definitely try this.
Excellant, thank you for such details. Jennifer
Thank you for the courtesy, Jennifer. Isn’t it a wonderful reason to keep planting?..
Wendy
Welcome, Jennifer
gracias por compartir tu experiencia!!!!!!!
De nada, Victoria! Gracias
I am a bit familiar with eco dyeing. I usually use silk, but also cotton and linen, My process is similar to yours. However I dyed a linen blouse( which I had previously dyed in Organic indigo) with mostly eucalyptus leaves and put a cotton (dipped in iron) blanket between sections. The cotton did print although on the dark side, but the linen blouse came out with mostly black blotches.The other items in the vat came out as more or less I would have predicted. I am not sure how to fix the linen blouse or why it happened.. Any suggestion?
I came to your site and fell in love with your garden photos and research. Since I am in northern Wisconsin, a lot of your research is relevant for me. Thank you for your generosity by sharing all this information( and the photos!)
Hi Nancy
So iron tends to fix colour ( the ones that need fixing ) and also changes it by darkening. Whatever colour you use with iron will change. Instead of using an iron “blanket” during dyeing, try painting or stamping ir stenciling on the iron liquor in selected areas after taking the cloth etc out of the dye bath.
Happy playday!
I just happened across this tutorial/forum by chance..lucky me! Have enjoyed reading it all and I have a question. I’ve been eco printing irregularly over the past 12 months with variable success, mostly on silk scarves. I’m wondering about a dye bath after printing. For example, if I were to put an eco printed silk scarf into a logwood Dye bath, is just the not-printed areas going to receive the logwood dye, or will it also dye the printed leaves so that I lose the leaf colour? I’d be grateful for any help thanks.
Hello Ms. Kipamela
If you post-dye the printed fabrics in a dye bath, yes, the eco prints will take on the colour of the dye bath; the eco printed colours will usually change a lot. You can also simultaneously simmer the tightly bundled eco prints in an immersion dye bath – you were mentioning logwood.
The areas exposed to the dye will colour and those protected by the bundling will remain the colour of the plants, with some leaking possibly. Check out the work of Irit Dulman and Fabienne Dorsman Rey whose results with simultaneous dye bath techniques are excellent. I have often used this technique with walnut dye and indigo. Good luck.
Thank you for that Wendyfe, very helpful information which I’ll use soon.
I feel like I’ve received a wonderful gift reading this post and comments. I’ve eco dyed a bit on papers and am now experimenting on silk. I did a few beautiful plant rubbing transfers but they disappeared almost completely when I bundled and soaked. I’m sure so missed a step somewhere but I’m not sure where. Could you tell me how to ensure prints stay? Should I have ironed or donething before next dye? Many thanks…what a wonderful community.
Thank you, Agnes. Best to check the cloud of tags on my blog and follow links to mordants. Also check the tutorials and the dye plant list which give some indication of which plants and substrates need treatment before eco printing. Ironing has little or no bearing on print longevity – possibly on definition of the print. You should try to read up here on the basics of how to print
Wendy, I really appreciate your site. I have been eco-printing, principally on paper with a bit on silk and cotton. I have a bought piece of 100% wool and want to know how to prepare for eco-printing. I see that I should wash it but uncertain with what and how. I would hate to agitate it and have the fibers bloom. Should I use synthrapol ? Thank you for any help.
Prepare wool for eco printing in hot but never boiling water, barely bubbling, and yes, a teaspoon of Synthrapol for a medium sized pot. Do not poke or agitate. Keep submerged by putting a small plate on top. Maybe 45 mins. Then drain and do not wring or squeeze hard. Pat, press and smooth the wool. Think as if you had a kitten in your hands. Rinse with warm water by gently immersing and changing water until it runs clear. No drastic changes in temperature, IOW. Use alum acetate as a mordant if the dye requires it.
Best of luck!
Wendy
Thank you so much for your help. I have been using Alum acetate for paper so I could just use it. I do have potassium aluminum sulfate too. Will take your advice.
If you can find Orvus paste, I think that is better to use with wool than Synthropol. Orvus paste is used by farmers to wash farm animals. You can also use New Dawn dishwashing liquid, the blue one ( I think) – this is the bird rescue soap – used to remove oil from feathers. Or baby shampoo. The water temp should be about 165
Hi. I will be trying this for the first time with my 11 yr old daughter while we are at our vacation home in North Carolina. We are all about experimenting but some of these terms are way over my head. In short, we will be using native flowers etc to do silk or cotton tablecloth. Can you just tell me the brief basics? I feel overwhelmed by wealth of info but really want her to see this process and create something memorable. Thx so much for lovely site!!
Look at the tutorial link on my home page for all the basics, Angi. They will give you and your lucky daughter a good intro!
Wendy, não tenho a menor experiência, mas gosto de qualquer arte, e sempre tive interesse em conhecer a arte eco em tecidos. Viajo para o exterior em breve, e gostaria de aprender a eco print, mas prefiro bem mais a prática no aprendizado, por isso te peço uma indicação de lugares e cursos onde eu possa fazer isso. Não penso em trabalhar com isso, apenas aprender e usar como uma grande terapia. Muito obrigada. Argelia
Hello Argelia
If I understand your question in Portuguese: you want to learn eco printing. If you can travel and if you are in Europe, contact Fabienne Dorsman Rey in the Netherlands. You can find her on Facebook. If you are in Brazil, I do not know anyone there. Another way to find a teacher is to join a natural dye group on FB. There are several groups so do a search there. I am in Canada but am not giving classes this year. Good luck!
I am printing on silk, cotton and paper. When I use alum as a mordant, my garment/paper always has a yellow/gold background. How can I maintain a white background with the leaves being the only color? Thanking you in advance for your reply. BTW- terrific website!
Hello Cherrie
Simple answer:I do not know how you might keep your print background white. It is unlikely that the alum causes the yellows you wish to avoid. The plants themselves( certsin plants, thst is) will give yellow with or without alum – the point of using alum is to fix the colour – without alum the pigments will not necessarily fix/ last on your substrate or print in deeper colours. But that longevity depends also on whether a dye pigment is substantive or not. Substative pigments e.g. like those from walnut, need no mordant. You do not say what plants you are using and they do not all give yellow.
Eco dyeing is a serendipitous craft. You can only predict so much. For myself, i like the surprises and seek less to control outcomes. Try using the same substrates but different plants, and only one plant at a time. This will control the colour spread to some extent. If you use several plants in one bundle, the pigments mix and you can only guess the probable result. The heat applied, the water content, the pressure in the tied or weighted bundle, the mordant, the substrate – on and on- these are variables that interactin unpredictable ways. Thus you have to experiment and keep re ords controlling outcomes as best you can by employing the minimum of conditions at a time
Wendy, If you plan a workshop, please let me know. I would love to try and attend. dotyuki@gmail.com. thank you.
Absolutely amazing. My daughter loved the leaf prints I added to her shirts.
Do you have any idea how to do this on wood?
Not a clue, Lindsey, other than trying the same as for paper and cloth.. I aam pretty sure the tannins and pigments already in the wood would share their goods. Try it!
I want to give it a try. The explanation looks very well
Great idea, Lia! Hope it works for you
Olá! Sou brasileira e iniciei nesse universo mágico e maravilhoso a pouco tempo, mas não consegui muitas informações sobre o assunto por aqui,por isso procurei em outras línguas e usei o tradutor.
Amei te encontrar e beber dessa fonte que generosamente compartilha.
Eternamente grata e feliz e me coloco a disposição para compartilhar o pouco que sei.
Beijos
Maria da Paz
dpazneves@hotmail.com
Thank you and many blessings, Maria! I wish you good luck with your new adventures here
You are welcome to continue drinking at the fountain, Maria! Thank you for visiting
Ciao,é possibile il tutorial in lingua italiana? Posso avere informazioni?grazie ,Giovanna.
French or Spanish but not Italian – yet! Thank you for visiting, Giovanna
Thank you for your detailed blog post. I am new to this and just attempted eco-printing this weekend before reading your post and have no imprints whatsoever. I used alum as a pre mordant, but now I think I need to use more of it. The instructions I had used half alum/ half cream of tartar? Have you heard of that? I have lots of new ideas from your post now and will get to work.
Not only alum as a mordant gets you a print. You need all the other conditions, also. You need to adjust your process depending on the substrate: cellulose or protein – IOW, are you printing on paper or fabric? What kind? Etc etc Look at the tutorial page and see if you have followed all the suggested steps.
Wendyfe: thanks so much. A question — when doing the steam method, I was shown that I can spritz the paper (that’s what I’m working with, instead of fabric) with a vinegar/water mix, then place the leaves on the sheet after first dipping them in an iron solution. So, if this method is familiar, can you tell me, is the iron solution just iron in water? Or is it another mix, say with water/vinegar and iron? I’m thinking it’s just water and iron, since we’re applying the vinegar by spritzing, but just wanted to get your thoughts.
There are various ways to get the iron on to the plants and paper, David. Mixing vinegar with water to spritz or just using plain vinegar to spritz – people try different proportions of each to see what happens. It is not really an exact process. Dipping, sprizting, soaking etc – they all work as process. Or of you make an iron water before hand and apply that in some way. Prints depend on the leaves you use and the tannins in the leaves as they interact with the iron
Thanks so much. A question, in tutorial at top you show image with plant materials laid out on fabric (soaked overnight in alum solution), with rusty metal bolts and such laid out with them. But next image shows wrapped bundles of cloth/paper, which seem to include only the fabric/paper and plant material.. So, I’m not sure how the rusty metal objects are included in the piece or in the process?
David, you can slip tiny bits of metal – eg small rusty nails or nails splashed with vinegar to rust them – inside the rolled up bundles – or inside flat stacks, too, among the plants.
Thanks for your responses Wendy! For the most part this seems a very experimental and experiential process — not so much chemistry as alchemy!
Another question: is it possible (or have you tried) doing the eco-dyeing process with without using iron (in any form), but just using Alum? (I am mainly working on papers, not with fabric.)
In the class I took we mainly used Iron (either rust added to water for immersion, or Ferrous Sulfate in water on the leaves or the papers/fabrics for steaming). Our teacher had a tray of alum with water, which she said we could dip our sheets into, but she made it seem more an option. It’s my understanding that Alum will ‘brighten’ the colors, but not sure if it can be used without the iron.
David, Yes – the process is about experience much of the time. As for the need to use iron: no absolute need. Iron in contact with leaf tannins creates darker colours or shades of colour. It can also make faint prints “pop” – but will change their colour to darker. Trad dyers use the term “sadden” a colour with iron (rust or ferrous sulphate)
To get a good print you do NOT need iron but you do need to take the trouble to find out which plants print well without it. Also, soak your papers for two hours min. Or overnight (my practice). Then choose leaves that print well – eg maple, sumac, anything in the prunus family. Wait a while until you try flowers – they tend to print less well and will discourage you sometimes. (Coreopsis is a supreme exception). A beginner needs a success to keep motivated. Next is to make sure you have firm contact between papers and leaves…put a cardboard then a brick on top of the pile… then steam the stack of papers (folded or interleaved) for at least 45 mins full blast bubbling…then tell me if you dare that you have no prints!!! There are many new ways to use iron…join the Printing With Botanicals FB group for really good info and Best Practice. Bonne chance!
Thanks Wendy. I have already had success, both in my class and when I tried it at home a few weeks later. At home, I used the steam method, dipping my leaves and such in iron/water solution. I collected plants nearby me, some of which worked, some not so much. I am really looking forward to more experimentation, and I’ve been trying to make notes about what I did so I can get a better sense of what works and what doesn’t.
One thing I have noticed is that sometimes I get interesting results from plants that some might say ‘don’t work’ because they don’t create a really dark ‘print.’ I’ve found, however that I can get interesting patterns and subtle colors from some of these ‘don’t work’ plants. All what you’re looking for I guess.
Best, David.
I agree, David! I find the varied patterns and subtle colours very much to my taste, perhaps even more that precise prints
I really enjoy your site! I have a question for you: I eco-print on handmade felt that is first mordanted with 15% alum. I know that eco-print fades, but do you have any ballpark figures for how long the fading process can take. Am I looking at 2 years? 5? 20? Any help you might have would be appreciated.
Good and important question, Helle. I have been making eco prints since 2011, having first learned about this technique from India Flint’s book. The “does it fade? ” question does not have a defintive answer, but rather “it depends”. As for how long: the same “depends”. Some of my prints are now just as they appeared in 2011; others have changed colours to browns, yellows and tans. I used potassium alum sulphate as mordant and sometimes iron as modifier to increase dark shades. The 2011 ones that faded most were printed on cellulose fibre, no iron; the silks have not changed. Leaf colours have lasted overall longer than berries or blooms. Anything from 2011 that was modified with iron on either cellulose or protein fibres has not changed. These fabrics have all been kept OUT OF THE LIGHT in closets or boxes, etc. My suggestion is to check the traditional naturak dye handbooks and look for lightfastness info for your particular plant. There are also tried and true methods to estimate fading and you can find instructions in such books. Jenny Dean’s books are great resources and she has biblios as do I. So that takes us up to seven years, Helle! The truth is that this technique of eco printing has not been around for long enough to talk about 20 years. And we have not discussed washfast characteristics….( I make art with most of my eco prints so do not worry much about laundry…my scarves are made of wool and silk and they have not faded year to year but they are in a closet away from lightand do not get washed, either. …Very few people are willing to address this question.
As for what plant dyes known to resist fading: search the literature for substantive dyes – e,g walnut, eucalyptus. Then make sure to use some of those. Forget beets! Make note of fugitive dyes like this and do not waste your time on them. Prepare all fabrics before dyeing/ printing as described in the trad dye literature. Do not skip this step.
Hope these few notes are of some assistance, Helle
Wendy
Thanks for such a thorough reply, Wendy. I really appreciate the tips and advice. Now I just have to keep plowing away, and I will definitely follow your blog to see what’s happening. Thanks for your help! All the best, Helle
I actually cannot seem to find the reply I sent you, Helle! It does not appear here. Which page were you writing from?
Hi
Here is the page you answered me on: https://wendyfe.wordpress.com/tutorial-leaf-monoprinting-by-cassandra-tondro/
Regards Helle
> 6. sep. 2018 kl. 23:46 skrev Threadborne : > >
I am seriously in love with all of your work and such helping tips but i have a confusion is it possible if i don’t use natural dyes in Eco printing and get the same result?
Actually i chose Eco print as my thesis topic so little stuck with all these.
i would appreciate if you would reply me with your email id, would like to talk to you in detail on it.
Love from Pakistan.
Certainly you can email me with questions, Afifa.
wendy.feldberg(at)sympatico.ca. Please note: I am not using the @ symbol in order to avoid trouble! Insert it when you email me
Wendy
Thank you for being so generous with your time and knowledge to create this detailed tutorial for us. I just recently discovered eco printing and dyeing, and discovered you today. I am so lucky!
Thank you, Anna Maria! i hope you love the new work you will do!
Wendy
Dear Wendy
Thanks for such a wonderful resource and your generosity in providing advice. I have been unpacking things left in storage for 17 years and have just discovered my dye pots so am very excited about venturing into eco dyeing and printing, something new for me. I am itching to get to work with eucalyptus leaves. However I have also seen some photos on the internet of silk with pale botanical prints on a solid darker background. I have read everything I can find but am clueless as to the method used. Any advice you can give would be much appreciated. Best wishes from Australia.
Hi Cheryl,
The prints you describe are probably made with plants for ecoprints and a dye carrier blanket.The plants resist the dyes in the carrier and also can print their own colours on the substrate – the dye blanket transfers its colour all around the plant prints. Join the FB group Botanical Printing ( or Printing with Botanicals) – there are many practitioners of this technique reporting on their work there; also lots of refs in the Files section of their FB page
Thank you Wendy. You described it perfectly. fB here I come! I really appreciate your help. Stay warm up there!
Hi, fellow Wendy! I found out about eco printing only recently and have been reading all that I can about it, mostly from the inspiring Australian artists. However, I am in Pennsylvania and am not lucky enough to have a eucalyptus tree in my yard, so I was ecstatic to find your wonderful glossary of North American plants. To begin with, I am interested in printing cellulose fibers, mostly because they’re more readily available than protein fibers.
I have a question about mordanting. I get the beginning with 5% alum by weight of fabric, but how much water do I use? I have a 53g container of Alum from the grocery store, which, if my math is correct, should be enough for 1060g of fabric. About how much water should I use for this amount? Many thanks for all the great information and wonderful photos on your site. It will be a continuing source of inspiration for me.
Use alum acetate not the one you got from the grocery store. (Long story) The amount of water for the alum bath does not need to be measured, Wendy. Just put your measure of the alum in enough hot water to dissolve it. Then add that to, say a bucketful of cold or warm or hot water. Then put your fabric into that water, leaving enough room for it to be covered without crowding. Since you have weighed both fabric and alum, you can eyeball your bucket beforehand to see if the fabric will fit! IOW do not try (as a small artisan) to mordant a truckload of fabric in one go. I start with the bucket size, say a gallon water, add the alum according to the weight of my fabric, then soak the fabric overnight or a minimum of two hours. You can add more water if the bucket holds it and the fabric is thirsty. The alum attaches to the fibres as it soaks. Another method of mordanting is to soak your fabric overnight in soya milk ( best to make it yourself)
Thanks so much for the speedy and helpful response. Glad I specified grocery store alum. Off to the alum acetate store I go. Ha! A truckload of fabric – love it! Nope, probably a bucketful of scrounged scrap white cotton just to play with to begin. I’ve read about soy milk mordant. Why homemade rather than store-bought?
The Divas of Dye tell us it is better. It is on my list to try!…So re that scrap cotton etc – boil it up (“scour”) before you use it – add a few tablespoons of soda ash and boil for a good hour – to get the gunk out before mordanting…After that, the best tip for eco prints is to get very good contact between plant and fabric. And try wool if you can find any, it prints the best of all. Good luck and thank you for visiting, Wendy
I’ll keep an eye out for some wool in the thrift shops. Thanks for your generosity in sharing your knowledge and experience.
Hello again! I can’t find alum acetate locally, only on Amazon in small quantities. I found on the Maiwa website that it’s possible to make a homemade version with a 50/50 mixture of sodium acetate and potassium aluminum sulfate (grocery store alum). Unfortunately, I can’t find sodium acetate locally either. I read online that combining vinegar and sodium bicarbonate produces sodium acetate. Have you ever heard of a mordant using vinegar, sodium bicarbonate, and potassium aluminum sulfate – which are readily available and inexpensive? If I weren’t a total newbie, I’d try experimenting myself.
No, I have not heard of that mordant, Wendy. In lieu of alum a,, try the potassium aluminum sulphate in a three step mordanting process if you are using cellulose fibres. OR you can skip the alum altogether and use soya milk. The instructions for using these mordants are widely available on the web – too long for me to write out in full here. If you can buy a dye book,Jenny Dean’s Wild Colour is my old fave; the newest good one is The Art and Science of Natural Dyes ( Ellis and Boutrop). Maiwa sells alum acetate, as does Dharma Trading, Botanical Colors. Soya milk is easy to use and now widely accepted as a mordant.
Wendy
Thanks for all the great advice, Wendy!
Sometimes I even take my own advice, Wendy! I am planning to try the soya milk as mordant for the first time in an eco print process on vintage linen. The Ellis/Boutrop book( aforementioned) recommends how to make your own soya milk but also that one can use store-bought (“acceptable” they say). It is a straightforward soaking and curing process, pre-printing, apparently. Must try it.
I can’t wait to hear what you think of the process once you’ve tried it.
Hello,
I am a bookbinder in search of how to ecoprint on leather (to make book covers). Have you ecoprinted on leather and if so, what is your process? I believe that leather needs no mordant, but beyond that, I cannot find any information online to guide me in this process. Please advise? Your website is incredible, btw, and I truly appreciate all the information and advice you provide!
Hi Joan! Thank you for your visit! I have never ecoprinted on leather. However, the Turkish artist ( a pioneer of the leather process) I linked to on the bookarts list offers online courses in English. http://www.boharbocazi.com. Some of the responses on the Bookarts L give links to US artisans who offer online courses…btw, I am not surprised to learn that leather might need no mordant since it has been treated with tannins – a successful mordant in various applications. Vegan leather is made of cellulose fibres mostly so will need a mordant I imagine. Eg soya milk …Good luck, Joan! Let me know how you go on
Hi Wendy, I am doing some leather next week and could not find the site http://www.boharbocazi.com. Could you please reconfirm site. thank you
http://www.baharbozaci is the right spelling
Thank you…found it on a FB post. Teaching somewhere..
I am very curious also about this process. I can not find this site either, and can find no reference to anything about this site on google either. If you find it could you please send a link. thanks.
Here is the correct spelling for the link to the eco print artisan who works on leather: http://www.baharbozaci.co
The correct link is http://www.baharbocazi.com
I am plagued with typos! http://www.baharbocazi.com
Hi wendy
Your to-the-point explanation of eco-printing is really time saving. I like your way of answering too. I have starting my experimenting natural dyeing with chemistry knowledge 2 years back although I have more then 25 years of reactive dyeing and printing experience for international trade with phD in Textile chemistry, But a beginner with natural dyeing. Pakistan is an agricultural country and having 4 climates in such a small region. A lot to search and experiment in this country which is blessed with forest, mountains, deserts with Arabian sea coastal areas.
Soon will share my findings. Please guide me if you have any suggestion.
Thanks for such concise knowledge sharing.
Regards
Sitara Tanveer
Wonderful to be in touch with you, Mrs. Tanveer! Thank you for your comments. My suggestion would be for you to join the Facebook group “Printing With Botanicals”. There is much great info there in the exchanges plus there is a reference file section. Many artists there also have informative blogs etc. One of my most admired eco print artists is Irit Dulman – she blogs at Gaia’s Echo. I would also suggest you check out the website of Maiwa in Vancouver. Charlotte Kwan, the owner, is a renowned international expert in natural dyeing and naturally dyed textiles; she is in touch with eco print experts also. If you look at the list of classes offered by this natural dye business you will realize the breadth and the depth of the interest in this field. You can find me also on Instagram @wendy_feldberg where I post mostly about the natural inks I am making from the same plants I use for eco prints etc. The best of luck with your new passion!
Que afortunada soy de encontrar su blog es maravilloso su trabajo y sus amables comentarios
Es maravilloso encontrar personas tan especiales que comparten sua conocimientos
Mil Gracias !!
Gracias, Sandra! Enjoy!
Thanks so much for such a detailed tutorial Wendy – I’m new to eco printing so it’s been really helpful. I teach arts and crafts at an infant school and I’d really like to try a simple project with the children next week (7 yr olds). Do you have any tips? I was going to try them with some pieces of cotton, pre-soaked in alum by me, and use leaves foraged from the school garden, plus sticks for wrapping. Obviously I’d do the steaming part in the school kitchen! I’d be most grateful if you have any further thoughts/do’s and don’ts…!
Thank you, Karen. I am happy that this kind of project appeals to the art teacher in you! The children would love it, I am sure. You could use papers, eg a watercolour paper, and fold/stack them maybe, and wrap them with strings between pieces of cardboard ( eg the board that comes with a pad of art paper). While waiting for the cooking/ steaming to happen, get the kids to hammer plants. Check out the terms ” flower pounding” or the invented term ” hapazome” ( see my blog entry on that). You might have to buy flowers for both types of projects at this time of the year. My best advice is: do a run through at home before you bring this to the classroom. Have fun! Afterwards, the kids can make little books or frame the …more art projects! Try folding the papers for the steamer by making an accordion
Wendy
this is an amazing tutorial and i am so grateful for all the instruction and tips. i would like to teach this technique in my area (MA) and was wondering how to bring the process safely to a classroom of adults , and what about the fabric? where can i buy it in bulk? and the source of heat?
Bayda, I hope you have an answer to your questions by now – I am late checking my blog. To get some general tips on fabrics and safety, read through the blog.
Hi ^_^
I’m new to ecoprinting and finding your tutorial is like a treasure. Thanks for being so kind.
I did some projects with my friends, mostly using alum as a pre-mordant, and use it again right before rinsing. We did it to avoid color fading. But I have read somewhere that using alum as a post-mordant may remove some color. And yes, the color always fade after the rinse. What do you say about it? I’ve just print some beautiful orange jati leaves on chiffon silk and I don’t want them to change, so I don’t want to use iron too. I see that you only rinse your fibers with water. Is that sufficient?
TIA for your response, and sweet greetings from Indonesia ^_^
You have several questions, Han. So first answer is yes, I always use water for rinsing.
Second, on the use of alum as a mordant. These are general answers for general practices. Some dyes need different treatments. Yes, I use alum as a mordant before I dye the cloth. But I make sure to scour the cloth first, then leave the cloth soaking in alum dissolved in water at least overnight. Then rinse the cloth before dyeing it.Then I dye the cloth in the dye bath. It may be necessary to let the cloth cool overnight in the dye bath. This varies with the dye and the cloth. You can dry the cloth and let it “cure” for a few weeks before rinsing in water. Try these and see what happens.
Hi, I subscribed to your blog. I have just started experimenting with eco printing and love your work and tutorials and all the recommendations. Greatly appreciated!
I hope your experiments are working well for you, Ravinder!
Can you follow all of the steps thru wrapping the vegetation in the wool around a copper pipe, and then wait a day before you dye it?
Yes, Tina -you can. If the cloth is wet and has been mordanted as recommended, you will even get a print. The longer you leave the bundle, and the warmer it is ( say, outside) the more pigment will emerge. Some people just leave the bundle like that outside for several days or weeks – or even bury it in the compost! If you go this slow route, wrap it on plastic or even another cloth.
Hi! Thanks for sharing wonderful experience and tutorials. I’m looking for such thing for long time to teach my son about how fabrics and papers are dying naturally, thanks to you for that. Will definately share with you our experience and pictures soon.
Thank you so much! I love to hear how the kids enjoy working with ecoprints – I am sure they will be very pleased!
Thank you. This was very informative. I live in South Africa and experimented with some of the indiginous trees in my garden and I think have been quite successful. Now have to practice with bundling
Hope your experiments have worked well, Gerda!