November Studio

It is the last day of November and the day of Saint Andrew, patron of Scotland ( Greece, too) and all Scots, even those like me from Orkney! Time to report on the month's art activities, though I will not be done writing before midnight Ottawa time; still, somewhere to the west of me it will still be Saint Andrew's Day.

But first, a goodbye to the colours of autumn in The Kaleyard, last seen in the early weeks of a milder-than-expected eleventh month:

Sumac and amelanchier:

Potted amaranth and kale:

A late assortment of fall colours, some from October:

The last one is the perennial geranium, a sturdy plant, green under the snow and trusty provider of colour in the eco print pot.

Here are some papers printed this month with geranium ( and cotinus)

A smaller geranium, greened by iron/rust in the dye pot:

…and cotinus: the little flecks of pink are lovely and most likely to show up at this time of the seasons.

Cotinus: Charcoaled by iron/rust neighbours in the bundle:

Geranium, two varieties, blackened and greened with iron/rust but still holding on to yellows:

As you might notice in the work of eco printers, yellow is a frequent colour. Some despair is possible.

But take heart, Dear Dyer. A solution is available from colour theory. ( As well as from some post- print tinkering- though not discussed here today – like touching up the colour with other dyes, paints or modifiers like iron liquor or copper liquor or ammonia. And no, post-print touching-up is not a ticketable offence according to me. You are the artist, and you get to do what you like with your art, especially in the establishing of your own purposes and the safe and rationale means of achieving them. )

Thus: To get the most of my yellows from season to season ( when they change value and even hue) I like to pair them with some strongly contrasting colours that can act as foils. In these prints, the contrasts come via rusty prints and cotinus; both leaves are tannin- rich that give deep charcoal or black in the environment of iron, and also some greens. Yellow and black are pretty powerful together.

And next, some more rust prints on paper, this time with indigo and tannins from tea: also powerful contrasts.


Winter wools are on my list of textiles for dyeing, and this year I am trying for that famous and popular ( but non-native hereabouts) eye-popping eucalyptus red introduced to us by our DownUnder Diva of Dyes, India Flint. I have a lot of dried euca around the studio saved from supermarket bouquets and welcome those Green Immigrants to the dye plant stash. Bundled with Prunus virginiana and immersed in a walnut dye bath ( Juglans nigra) prepared in a crockpot with the heat set to “low” and left overnight, some of my wool fragements look like this:

Don't the colours look familiar?

The prunus gave the teal greens and even purple, while the euca gave ranges of reds and orange with a tad of yellow. Of course, the walnuts give rich brown on wool ( though much paler on linen) So here, we get the power of analagous colours in teams beside colour complements in the red and green.


My most recent project this month was with Dylan, my wee grandson, aged six. We have done lots of painting and stamping and so forth on big sheets of paper, using a very basic palette of cadmium yellow medium, cobalt blue and some kind of red (we lost control of the inventory – most likely the red was cad. red) plus a nice metallic gold. Those paintings mount up – kids are decisive and prolific painters and do not hang about obsessing over the next brushstroke as we adults might tend to do. i heartily recommend a session with a six year old to get you out of your Art Rut. Just try keep up with that kid! But what to do with all our paintings as they piled up?

I hit on a plan to keep the works but to make them easier to store and fun, too. We will make books and boxes, said I!

So we have been making books and boxes from each single sheet painting, working with origami-type folds and no glue. This is an ongoing project, so today I am sharing just a few. The first is a wee box made in the style of the compartments in the Chinese Thread And Needle Case that I completed earlier this year.

For this one, Dylan and I stamped the paper with wooden Oshiwa blocks ( also reported on my blog in the past) and carved Indian textile blocks:

Others we made from painted papers:


And a larger box from some of my above-described geranium-cotinus prints:


If you want to try these boxes yourself, keep the ratio of the paper three times the size of the finished box; thus, the 'Geranium' box started with an 18″ square piece of paper and folded down to six inches and a tad as a box.

Here are some pics of a box under construction, to refresh your memory for the folding sequences: as you can see, you need to fold the large square of paper into a nice grid. The centred square (fold) is the bottom of the box when all the folds are in place. Two boxes fit on top of each other to make one box with a lid.


Next time, some more art from the studio with my young apprentice, who, bye the bye, was able to anticipate the next fold in his box as we went along…so you can do it, too! And it's a good time of the year to make gift boxes!

i shall likely post again about the art- from-grandkids' paintings sooner than I might otherwise do – I am grounded this week after a wee bit of surgery to my foot! But the mind keeps travelling, Dear Reader…and the hands can still move.

The blessings of Saint Andrew's Day on ya'all!


Wendy


April Adieux

At the start of the month of April, the Kaleyard was not without some ragged post-winter charm:

Kaleyard_march2015

After the spring clean-up:

CleanKaleyradSpring2015Meanwhile, the indoor dye garden is growing.

First. Japanese indigo (Persicaria tinctoria). I layered the long stems to encourage rooting at the nodes of the one plant that survived the winter indoors (most of them dried out while we were away in January, no reflection on the plant’s vigorous survival mechanisms)

JapIndiogoPlantThe seedlings from last year’s crop of Japanese indigo seeds are appearing:

JapIndigoSeedlingsAnd perhaps some seeds have survived the rigours of the winter outside: on verra! After the winter the leaves have taken on that teal colour of the Japanese indigo that I harvested three times last year and dried.

JapIndiOutsideSeedlingsOther dye plants from saved seeds:

Baptisia australis:

BaptisiaSeedlingsTagetes pumila (Lemon Gem marigold):

LemonGemSeedlingsThe beloved black kale ‘Lacinato’:

KaleSeedlingsAnd the Indigo indigofera that I started from seed last year and kept as a pet in a pot:

IndigoPlantHere are some Indigo indigofera prints on paper with rust; the indigo is from the pre-reduced crystals:

IndigopapersSome old favourites of mine, the red amaranth that Hopi Indians used  for colour. I had them in my old garden where they self seeded abundantly; here, for my new garden which will be in its second summer in 2015 , I bought seeds:

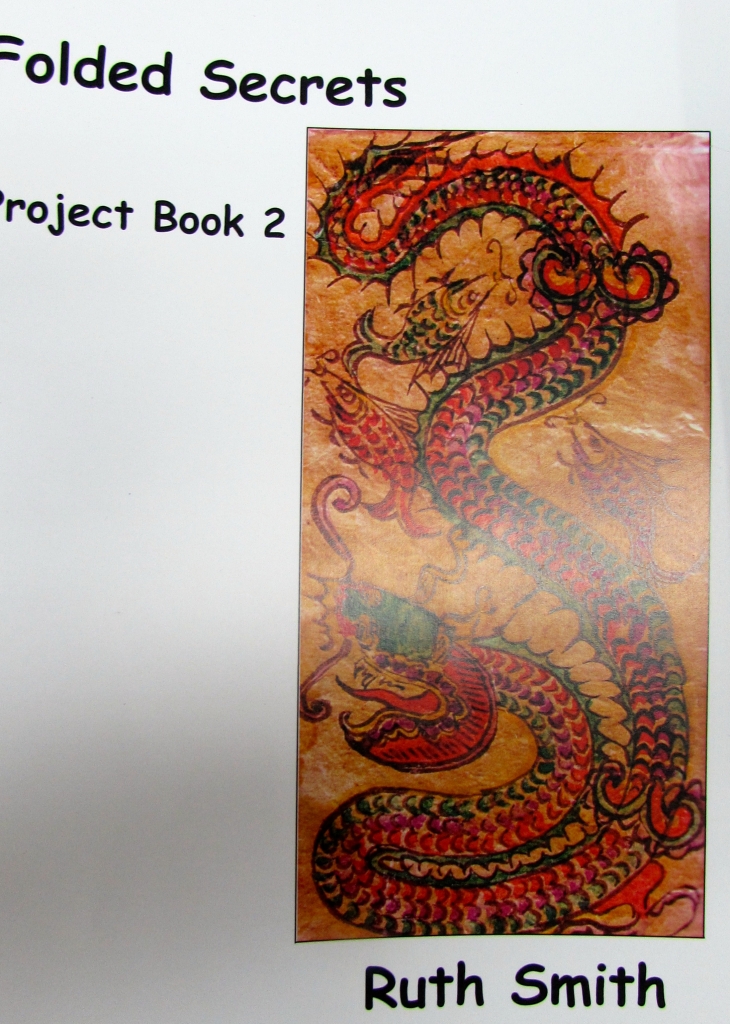
RedAmaranthSeeddlingsAnd now as promised, here are some more images of the making of the Chinese Thread Book reported in my last post. First, better image of the first of Ruth Smith’s books on the Miao needle case:
RSmithBk1
And a second book by Ruth Smith (both sent to me by Kit Tyrrell in the UK, so kind!) on other structures similar:

RSmithBk2
Some of my trials before making the finished version. I tried several kinds of paper and book cloth before I made my own book cloth from mulberry paper and eco dyed and rusted linen tablecloth damask, recycled of course. I keep my “trials” in a project box so that I can refer back to the experiments as well as my instructions to myself for the completed work. (If you think you will remember…ha ha…):

ThreadBkTrialsMore trials:

TrialBoxAnd on leaving the cool and cruel month of April, let’s say goodbye to the lovely bloodroot which has begun dropping its white petals:

BloodrootApril2015Next time:

I am experimenting with eco dyeing on cheapo cotton knit from the auto parts store (sold for polishing cars). It comes in one metre lengths and in tubular form. At 99 cents a metre on sale…
CottonKnit

And perhaps I will get to finish the next in my ‘Botanica’ series of Artist’s Books. The next one is “BOTANICA: Gardenista”. The book is done, and I am planning the case or cover.

Last Word

I have updated my Tutorial Page with one on the basics of eco printing on paper and cloth.

Also, the Dye Plant Page has been updated; I will continue to update it as the plants allow me to photograph them! I am waiting for some of the bushes in my garden to leaf out. I prefer to use my own photos of plants in my garden and environs.

A la prochaine!

March Means…

…Gardening indoors and thinking plants! The Kaleyard is still under deep snow…so this is a quick little post to remind us all that spring is on the way- no matter how wintery it looks here:

IMG_0834

Undeterred by the white stuff (and the hungry bunnies eating the shrubs I planted last year – they have severely “pruned” the serviceberry and the purple sand cherry – will I any have eco dye materials left? ), I have been updating my dye plant page (see sidebar) knowing that readers are ‘thinking gardens’ also and have begun checking on other gardener-eco dye enthusiasts’ experiments.

I am adding native plants to the current list; and even though I garden in Zone 3-4 USDA, gardeners in other zones, higher and lower, can safely try many of the plants that give pigments for me in this neck of the North American woods. (I was very interested to read in “The Founding Gardeners” by Andrea Wulf that Jefferson, Adams and Franklin, the U.S. Founding Fathers,  found inspiration for native American plantings when they saw how well North American natives were growing in British gardens.)

In other biz: Bookbinding experiments! CBBAG gave a workshop last weekend.

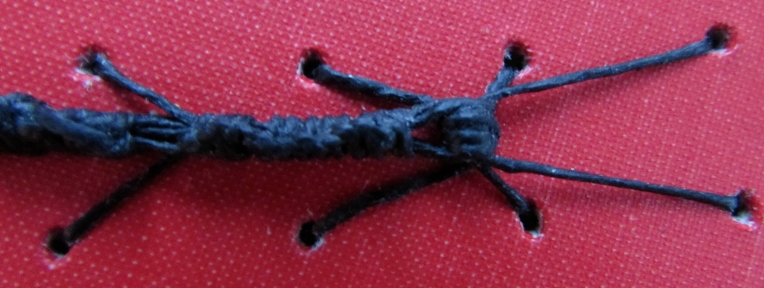
We learned the caterpillar stitch. It’s a little tricky to start out with – I found it best to practice making the ‘head’ of the critter a few times before moving on to the body; using waxed thread and two colours helped a lot,  too, and so did YouTube!

IMG_0814 I tried out the body of the critter on some fragments of painted canvas ( from my chair project, reported here): not very neat wrapping of the caterpillar body…but I like the long antennae and tail.

IMG_0818


The final effort came out like this: I used traditional book cloth to cover the boards and black waxed lined thread to sew the caterpillar. We punched holes in the boards to make the shape of the critter. Then we stitched across the signatures with a chain stitch first, top and bottom. to hold the cover boards in place; then stitched across the signatures using the caterpillar body stitch.

IMG_0858A close-up of the wrapping: I knotted the thread so that a ridge would form on the caterpillar’s back:

IMG_0861Our awesome teacher, Mary McIntyre, is the Pres of CBBAG and a conservator at the national archives. Needless to say, her caterpillars rock:

IMG_0826Next time, Philip Taafe ands his patterns (I promise)…plus a report on how I am binding the envelopes with enclosures that we made for the annual CBBAG swap last month.

I am experimenting with the Chinese Thread Book style. I have twenty envelopes to bind and I was thinking some kind of interesting container would be nice. I found a lovely blog at http://www.barleybooks.com whose author mentioned this binding and so I went looking for how-to ‘s. (Not many available…) The structure is actually a needle and thread case devised by the Miao and Dong peoples of China, both famous for their embroideries. Their needle- thread cases held pattern pieces, also, in a series of ingenious folded pockets made in paper and textile.

Meantime, welcome to all the new readers and thank you for joining us.

Wendy